Blog #97 Building Plans – Endwall Elevations
This is day 4 in discussion of building plans, which pages show what features and how to “read” them.
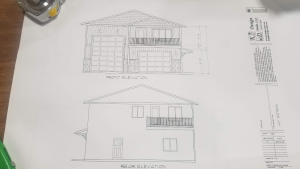
Endwall elevations are most often where sliding doors, overheads and entry doors are placed. Not always, as some folks use the sidewall as the “front” of their building. It always makes me smile when folks start to talk about the “west” or “south” end of their building. Now this would be an apt description, if only I was standing on their property and had a clue as to which way was North or South! Whatever you call it, the gable end…is still an “endwall”.
 Here’s where specifics on your particular doors will be drawn, with heights of the openings so your doors fit properly. It will also show the relationship of the 4” nominal concrete floor to the skirt board, or peeking out through any door openings. The really cool thing about pole buildings is…you don’t have to pour a concrete floor at time of construction! The posts with the concrete around them are your foundation, and if you never decide to plunk down the money for a full concrete floor, your building will stand the test of time just fine.
It’s easier to do the concrete at time of construction, with the skirt boards as your concrete “forms”. You can nail a scrap 2×4 across the end of door openings while pouring, and pull them off after concrete is set. It’s easier to pour concrete when the building is relatively empty, rather than haul everything you’ve stored in there to the outdoors, in order to add a floor down the line. For those on a budget, “later” may be the best option, and we’ve had countless folks do it either way with great success.
Endwalls again show all of the posts into their respective size holes, how far to hold up the poles so you can do the holes all in one pour. Endwall girts and spacings are shown on this elevation, with differences for sizes in lumber and spacings due to some of them possibly ending up in small (less than 5’) or even smaller (2’ or less) bays. Shearwalls are shown on this view, although the detail on shearwalls (included on this same page) will give you a close up view of how to build one. Shearwalls are very important for those small bays left after taking big chunks out of an endwall for one or more doors. It’s just a matter of adding bracing and osb to provide a “stiffer” endwall against the wind. Important but definitely not hard to build.
Endwalls will also show location of the wainscot girt to support those shorter panels. Additions to the trusses are what are termed “siding backing” 2×4’s which provide additional support and a place for siding to be attached, as the end trusses are notched in. Endwall truss to post connections are shown, along with a detail for a close up view.
If there is an entry door in an endwall, details on how to frame it in are shown, as well as any windows.
Both rear and front endwalls are shown on the plans, with the full endwall drawn, not just a portion of it as I’ve seen from other pole building kit providers. We give you a complete view of the framing, and a good visual of your new building taking shape.
Check out the endwalls on a set of sample plans.
https://www.hansenpolebuildings.com/sample-plans.htm
Tomorrow we will discuss the sidewalls elevation drawings on a set of plans. In some ways they are similar, but definitely not the same as endwalls.
Have a good one!


