Actual Brick Considerations for Barndominium Wainscot
With post frame buildings becoming a ‘rage’ for use as homes, barndominiums and shouse (shop/houses) alternatives to dress them up are quickly arising. Amongst these options are clients looking to have actual brick wainscot, as opposed to using a different color of steel siding, thin brick, or other cultured stone.
I have opined upon this subject previously (https://www.hansenpolebuildings.com/2018/08/brick-ledge-on-a-pole-building/), however it is now time to dive deeper into it.
Preparing an exterior surface of a post frame building wall for a brick veneer is a simple and straightforward procedure. This article will supply you with some helpful information if you are planning to install a brick veneer on your barndominium’s exterior.
First, term “veneer” can have a dual meaning. In construction terminology,“veneer” is applicable to any exterior finish material and this includes standard brick masonry installed onto an exterior wall. “Veneer” can also be taken literally to mean a thin superficial layer of material installed directly onto an exterior wall surface. There are many thin-brick wall systems available utilizing brick only ½ to 1 inch in thickness as opposed to a standard 4-inch nominal (3 ¾-inch actual) thickness. It typically consists of a thin layer of stone or brick mounted with adhesives directly onto a substrate material and is installed in panels.
Step 1: Structural Support for the Brick Veneer
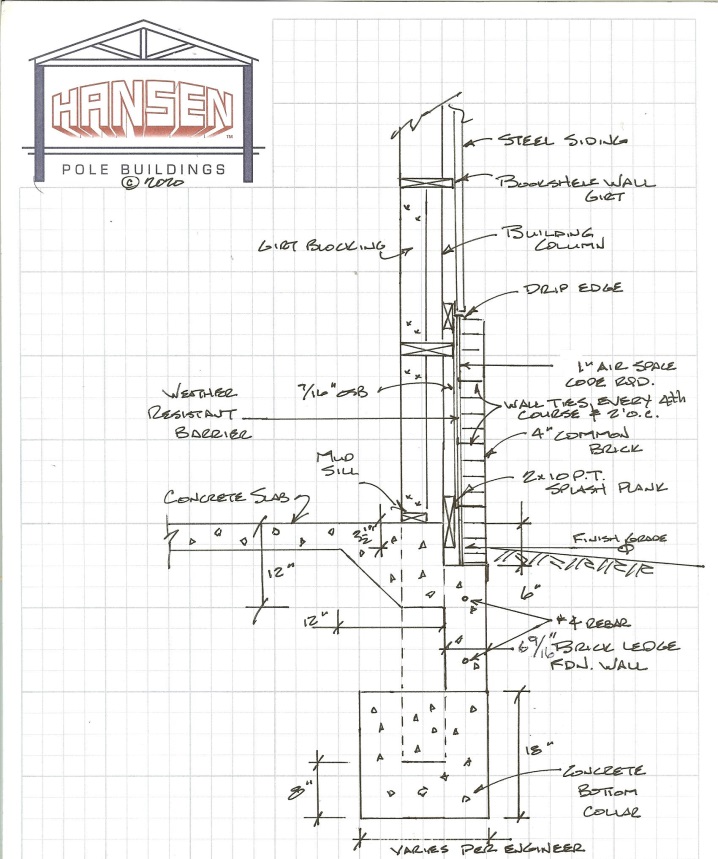
A fully assembled brick veneer is quite heavy and requires adequate structural support. Support is provided by a brick ledge as part of a foundation wall above wall column’s bottom collars. A decision to install a brick exterior is therefore made during conceptual design phases of your new barndominium’s construction. A brick ledge is constructed simply by adding a 6-9/16 inch thick concrete foundation wall outside your post frame building’s wall column. Ledge height will be six inches lower than top of finished concrete floor. Without an adequate structural support by a brick ledge, brick masonry is not an option for your barndominium’s exterior.
Step 2: Be Sure to Provide a one inch Air Space between Sheathing and Brick
Brickwork bears directly upon the concrete ledge, wide enough for both nominal width of brick and a building code required one inch air space. This one inch air space between sheathing and brick allows wall to “breathe” by providing an outlet for air and moisture. It also accommodates any irregularities in the wall surface.
Step 3: Install Weather Resistant Barrier
A weather resistant barrier (https://www.hansenpolebuildings.com/2016/01/determining-the-most-effective-building-weather-resistant-barrier-part-1/) must be installed onto sheathing to prevent water from entering the inner wall assembly since brick veneer itself is not water-resistant.
Step 4: Install Wall Ties to Anchor the Brick to Sheathing
Lateral support for brickwork is provided by wall ties or brick anchors. They generally consist of L-shaped strips of corrugated metal 1 by 6 inches long nailed through sheathing into wall girts (https://www.strongtie.com/clipsandties_miscellaneousconnectors/bt_tie/p/bt). Horizontal component of brick tie penetrates into brick veneer at a mortar joint. Ties are installed at every fourth brick course and at two-foot horizontal spacings.


Looking to get a quote for a sliding barn door and sealing it up
Thank you for your interest. Hansen Pole Buildings only supplies sliding door components with an investment into a complete building package due to challenges of shipping without damage. You might try the ProDesk at your local The Home Depot, as they should be able to special order them for you.