My maternal great-grandparents purchased a cabin on Newman Lake, Washington from its original owner/builder in 1937. Nine years later, it was sold by them to their son and his wife – my grandparents Boyd and Jerene McDowell. A little over thirty years ago, I inherited this cabin from them. Having grown up spending most of my summers there, I envisioned turning this cabin into a year-around home.
This cabin’s original hand split cedar shake roofing (on a 7/12 slope over 1x skip sheeting) had been replaced once, by my father – and we enjoyed using these original shingles as fire starter for many years. This second roof was then again replaced with Cocoa Brown polyester painted thru-screwed steel. Polyester paint, while certainly a step up from bare galvanized, did not maintain its original luster for long (for extended reading on Polyester paint: https://www.hansenpolebuildings.com/2014/05/polyester-paint/).
As my vision involved significant remodel work, we opted to change roofing to a SMP paint (https://www.hansenpolebuildings.com/2014/05/smp/) with an actual fade and chalk warranty. Through a series of events, our remodel schedule had to be moved forward from its originally intended Spring start, to doing work in Winter. Again (keep in mind), in Northeast Washington. Of course, as luck would have it, reroofing coincided with bitter cold and snow showers – resulting in speed of installation becoming of utmost importance. While I did much work myself, I had an assist from a casual labor wrangler appropriately known as “Big Kevin” who would round up day labor as needed. This reroof required some of these extra bodies.
 Fast forwarding a few years, I found some steel roof thru-screws were “backing out”. Upon careful examination, I found out why – in a hurry to get roofing installed, Big Kevin’s casual help had decided it would be quicker to pound screws in with a hammer (as could be evidenced by damage to screw heads)!
When screws are either over driven (or beat in by hammer), it damages wood fibers reducing or virtually eliminating their holding power. There was a solution – replacing these #9 diameter screws with larger #14 screws. These larger diameter screws, installed properly, were then able to get a firm bite into undamaged wood.
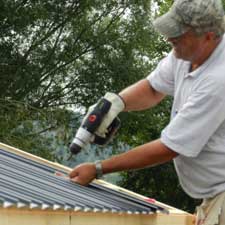
Using an actual screw gun (rather than a drill motor) with a clutch prevents most instances of over driving screws. Should a screw inadvertently be over driven, there is a quick field fix. All it takes is a short 2×4 and a table saw. Cutting with grain of wood, make a series of cuts in both directions to leave 1/8” squares remaining when looking at the 2×4 end. Turning to cut cross grain, chop these off in one-inch increments. This results in what appears to now be headless match sticks (albeit from much stronger lumber). Remove any offending screws and carefully drive a 1/8” square by an inch ‘plug’ into the screw hole in the underlying purlin. A screw can then be replaced into a plug filled hole, where it will happily remain in place.


