Stairs – One step at a time…
When I was working for Coeur d’Alene Truss in the 1970’s, I would physically go measure buildings (when requested) to make sure the building being framed, matched the plans which had been provided for the truss takeoff.
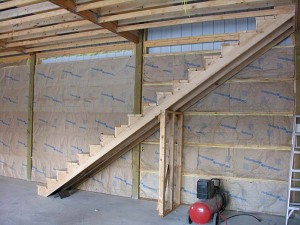 One of my favorite framing crews only asked me out to measure when they were doing a house with stairs – because they had never been taught how to cut stairs and were relying upon me to figure out the stairs for them. I never did actually have to measure any of the houses they were framing…..they always matched the dimensions shown on the plans.
With a bit of foresight, stairs are no longer mysterious.
Most Common Stair Mistakes:
- Not enough headroom (6’8” is minimum above treads).
- Rise is too great, or run is too small.
- Cutting treads wider than width of stairs ordered.
- Failure to set bottom of stair stringers at 4” above grade.
For Residential (R-3 or inside R-2 occupancy buildings), Residential Accessory Buildings or “U” occupancies, maximum stair rise is 7-3/4” and minimum run is 10”. For all others maximum rise is 7” and minimum run is 11”. Now these requirements are from the International Codes, I have seen some local Building Departments amend these (usually allowing steeper stairs).
To determine actual rise and tread numbers required, take height from concrete slab top, to second floor sheeting top (in inches) and divide by maximum rise (7.75 in most cases).
Example: 10’ = 120” vertical distance divided by 7.75” = 15.48. Round result (15.48) up to nearest whole number (16).
This becomes actual tread number which includes floor itself.
Next, to determine actual rise of each tread, divide height (in this example, again 120”) by total tread number. 120” divided by 16 = 7.5 (or 7-1/2”).
Use a framing square to lay out cutting on one of (3) three 2×12 stair stringers (stairs 48” and wider require four stringers).
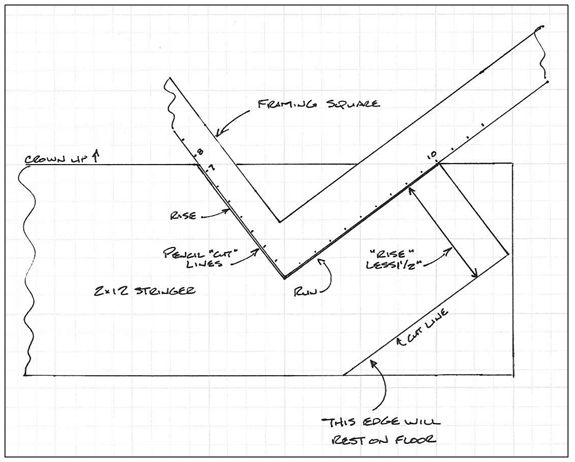
Use a circular saw to cut 2×12 as far as rise and run line intersections. Use a hand saw to finish cut. After first stringer is cut, use as a pattern for the other two. Cut a 2×6 as a strongback to reinforce each 2×12 stair stringer.
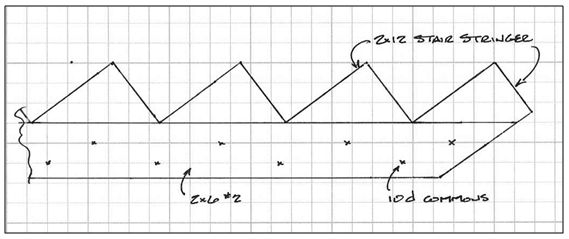
Nail one 2×6 to each 2×12 stringer with staggered 10d commons approximately 6 inches o.c.. Important, nail the 2x6s on left side of (2) two stringers and right side of the other.
Install two stringers in stairway hole with 2×6 strongback reinforcements toward the stair outsides (against walls, if any). This will make outside-to-outside 2×12 stringer measure 3” less than the stairway opening width. Center third stringer between other two.
Cut 2×6 treads (two per step) to a length 1” less than stairway width (36” for 3’ wide stairs).
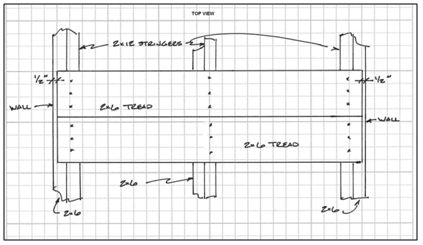
Install on stringers with each end of treads 1” past outer stringers.
Overhang treads past step below by 1”.
In the case of an 11” minimum tread requirement, treads will overhang ¾” and place a 3/8” space between the two 2×6 treads, as well as between the rear tread and the stringer.
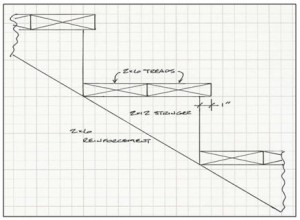
Rip 2×4 lengthwise to form 2×2. Cut the 2×2’s to fit tight left-to-right between the vertical faces of the stringers. Place 2×2 so it is no more than 4” above or below a stair tread. Nail through stringer into each end of 2×2 with two 10d nails.

All stairs which go to within four inches of grade (whether sitting on top of a concrete slab or not) must be isolated from ground by placement of two pieces of pressure treated 2×12 below the bottom. These may be embedded into a concrete slab or pad.
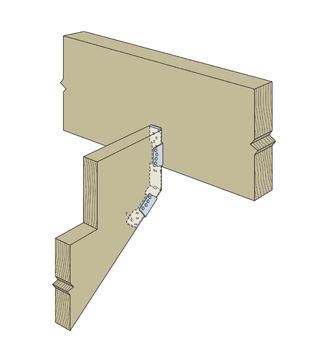
Top of stair stringers will attach to either landings or next floor framing by use of a Simpson LSCZ bracket
Following these simple steps (pun intended) will have you and your friends walking up and down your new stairs in nearly no time at all!



I still hate the strength loss by not using a dado blade instead of cutting so much from the stringers. Cut with dado to .25 inches and you will lose only a very small portion of grain and strength. It’s the only way I will build stairs. Also saves time an number of cuts.