Creating Extra Work In Barndominium Framing
A supposed downside of post frame (pole barn) buildings for barndominiums is having to frame a wall inside of an exterior wall in order to create an insulation cavity and a way to support interior finishes.
 This myth is created and propagated by post frame kit suppliers and post frame builders who do not understand there is a solution – and a very cost effective one (in both labor and materials).
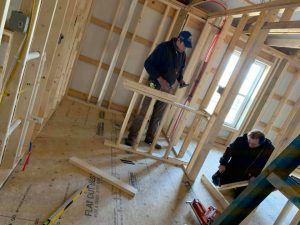
Rather than framing exterior girts (as shown in photo) and then adding vertical stud walls between columns, bookshelf girts can be utilized.
I’ve done several thousand pole buildings using this “bookshelf” or “commercial” girt method. I have two of them myself – in Northeastern WA, so I have a cold climate to contend with.
Use a commercial girt one size larger than wall columns (2×8 on a 6×6 post, etc.), setting commercial girts so 1-1/2″ hangs past the column’s exterior face. Wrap framing with a well sealed high quality Weather Resistant Barrier (for extended reading on Weather Resistant Barriers https://www.hansenpolebuildings.com/2016/01/determining-the-most-effective-building-weather-resistant-barrier-part-1/).
As an alternative to using a Weather Resistant Barrier, closed cell spray foam can be applied to the interior face of siding as part of a flash-and-batt system https://www.hansenpolebuildings.com/2020/01/flash-and-batt-insulating-barndominium-walls/.
You will find this installation method compensates for any irregularities in column dimensions and creates a deeper insulation cavity. Side benefits – electrical can be run around column exteriors, without a need to drill through them to run wires. On walls a multiple of three feet in length, it also saves having to rip an edge of a panel off either the first or last sheet of steel on a wall.
In either case, block ends of bookshelf commercial girts solid against columns with what is called a “bearing block”. Take 2×4’s or larger (depends upon engineering) cut 22-1/2” long to fit between commercial girts and install them flat against the post on faces where girts will attach. Wide face of the block should be flat against the column and aligned with the post edge (not sticking out past column edge unlike girts). Nail these girt support blocks to columns with a minimum of two (2)10d galvanized common nails at each end (higher wind loads may require more nails). This type of nailing is quick and easy and provides a solid support for commercial girt above blocks. This is a far more solid and stable connection than toe-nailing. Toe-nailing is done by angling a nail upwards from bottom (or downwards from top) of commercial girt, at a 45 degree angle trying to catch enough post edge as the nail goes through to column to hold it there. Toe-nailing is a very poor connection (and is subject to lots of installation errors).
For maximum cost effective R value, use BIBS insulation. I found it to be cost competitive with installed batt insulation, has a higher R value and completely fills all voids. https://www.hansenpolebuildings.com/2011/11/bibs/
I fondly remember a gal who called me one day asking for “canning jar shelves”…you know like you did before for us.” Checking our records, I quickly discovered we designed commercial girts on their first building. They liked them so much – they wanted them again!


