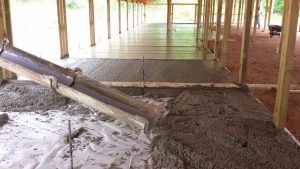
Concrete Slab Larger in Footprint Than Building
Reader JAMES in SOUTHWICK writes: “I built my floor wider than the building. A mistake I know! So now I was going to screw a piece of PVC into the bottom of my bottom girt to rest on floor. Then I was going to silicon around PVC to help keep water from coming in. My thought is the PVC would be rot resistant. Is there a better way?”
Unless your concrete is extremely out of level, you should be able to just glue your pressure preservative treated bottom girt directly to slab. This would eliminate any adverse aesthetics caused by use of PVC.
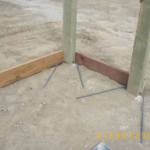
Using adhesives to attach pressure treated wood on concrete is an alternative to screws, nails, and bolts. When choosing glue, you must ensure it complies with several requirements, including local radiant heat lines and structural requirements.
It is crucial to note some adhesives are not recommended for use on concrete as moisture tends to cause wood to contract, breaking bonding ability to concrete. CT1 Hybrid polymer adhesive has no solvents, and is ideal for pressure treated wood on concrete. https://www.ct1.com/wp-content/uploads/bsk-pdf-manager/2020/09/CT1_Product_Info_sheet_TRIBRID_10_09_2020.pdf
Alternatively, you can opt for a liquid nail construction polyurethane adhesive. First step is to remove any dust or debris from concrete. You will need to prepare surface according to adhesive’s requirements. Some adhesives require concrete to be damp, while others require concrete to be dry.
Depending on adhesive, application may need to be on both wood and concrete. Evenly apply adhesive to wood in a zig-zag pattern. Use a pencil mark where glue should go on concrete to avoid wasting bond. Spread evenly with a trowel. Adhesive should ideally be about one-eighth inch thick.
Tap out any air bubbles from adhesive. Place and press pressure treated wood on concrete aligning to line on concrete. Use a wedge to compress bottom edge to concrete. Leave to dry, curing for 8-24 hours. The longer it sits, more bonding it will provide.
Complete process by using a dry cloth to clean up any excess adhesive oozing out.
 D
D DEAR TJ: I know this is difficult to believe, but you are the first person to ever have this problem. No, not really, it is a common occurrence and I have been guilty of it personally. Whatever one constructs, it seems the possessions increase to fill the available space plus 10%.
 DEAR TALMADGE: It is aggravating when builders are in such a hurry they neglect to do simple thing such as using the adhesive, which is on the reflective radiant barrier tab already, to seal the barrier seams. All it would have taken was to peel off the pull strip! You can tape the seams from the bottom, which is going to be a lot of work and which your builder should offer to do for you at no charge. In order for the reflective radiant barrier to function properly, it needs to create an air tight barrier between warm moist air inside of your building and the cooler roof steel.


