Tag Archives: American Concrete Institute

Allowable Variations in Concrete Slabs on Grade

Allowable Variations in Concrete Slabs on Grade

Growing up, I witnessed my Father forming and pouring four foot squares of concrete for our backyard patio. He would alternate them between smooth finish and exposed aggregate to create a variation in appearance. Oh how he made it look all so easy.

Me – I know very little about concrete finishing, other than I try to avoid it like a plague. Those perfectly finished squares by my Father, I could seriously bungle. If I need concrete finished, I hire a professional.

When hiring a professional, how does one determine if an outcome meets accepted practice? ACI 117-10 American Concrete Institute “Specification for Tolerances for Concrete Construction and Materials” should be included in contract documents with your finisher.

Here are some relevant sections:

2.2.1 In slabs four inches or less in thickness rebar placement from top or bottom of slab shall be within ¼” of specified depth. Over four inches thick, deviation can be 3/8”

2.2.2 Concrete cover of rebar from concrete surface can be no more than 3/8” less than specified.

3.3.2 Drilled piers (poured for wet set brackets) can be as much as 1” too tall or three inches too low.

Here is a big one:

4.4.1 Top surface of slabs (slabs-on-ground) can vary by ¾” up or down. Seems like a lot to me personally.

Paying to have fine grading done?

4.4.5 Fine grade of soil immediately below slabs-on-ground can also vary ¾” up or down.

4.5.4 Thickness of slabs-on-ground, average of four samples for every 500 square feet poured, can vary no more than 3/8”, with maximum variation for any one sample being ¾”.

Table R4.8.6.1 gives methods to determine flatness of a given slab on grade. In simple terms, placing a 10 foot straight edge anywhere on slab should yield a gap no larger than 3/4” to meet a conventional application. For “moderately flat” maximum gap would be 5/8” and for ‘flat’ 3/8”.

Another Case for DIY Post Frame

Another Case for DIY Post Frame

Reader BRIAN in CINCINNATI writes:

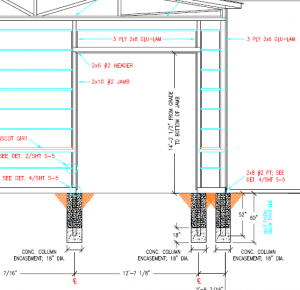
“A construction company is putting the shell of my building up 60x80x16. Just finished steel siding and roof. A number of the 6×6 poles are visually not plumb. My garage doors were being installed today when he called me with concerns of the building being off and not square. He has over an inch gap already only 8 ft up on doors of a 14 foot door. I did call the post frame company and will be sending someone out as well as a crew for attempt to fix. What would you do and can this be fixed without removing all steel liner sheets?”
Mike the Pole Barn Guru says:

Most of our clients build DIY (Do It Yourself) and simply do not have issues such as these.

Why?

Because it is theirs, they care. They will actually read and follow instructions.

Hiring a contractor? Your work starts before you sign a contract.

  • ASSUME YOUR PROJECT WILL END IN COURT
  • ASSUME YOUR CONTRACTOR IS UNTRUTHFUL
  • ASSUME YOUR PROJECT WILL BE MORE EXPENSIVE
  • ASSUME YOUR PROJECT WILL TAKE LONGER THAN EXPECTED

Failure to accept these four statements will set you up for grave disappointment.

Standards for workmanship should be clearly specified in contract between you and your builder. For post-frame buildings this would be Construction Tolerance Standards for Post-Frame Buildings (ASAE Paper 984002) and Metal Panel and Trim Installation Tolerances (ASAE Paper 054117). Depending upon scope of work, other standards may apply such as ACI (American Concrete Institute) 318, ACI Concrete Manual and APA guidelines (American Plywood Association).

During Construction

Visit Your Site

Tend to your site often. Show up at least twice a week (if not daily). During your visit, take pictures, lots of pictures. Purchase a camera with a Date and Time Stamp. Identify areas, in picture, with some type of signage, “Master Bedroom from Door Entrance” would be an example. By your project end you should have hundreds of pictures of every phase. Get a thumb drive if needed. Be able to read your “Approved Drawings” as well as all Installation Instructions.

Site Conditions

I cannot stress this enough, it has been my experience the single biggest project quality indicator is organization. A good job site should seem organized. If your project site is disorganized, trashy, and cluttered, so is your project. This should be your indicator to take more pictures and notify the contractor this is unsatisfactory. Every sub-contractor should have a clause in their contract that they should clean up their mess. It also means your contractor either doesn’t care or is not holding their Subs accountable. If you do not want to be responsible for clean-up and hauling off trash, make certain to include this in the contract.

Under no Circumstances Provide Assistance.

An impulse to “help” or “get a job done” is natural. Remember once you touch something, or provide support in any way, you have some liability. Every trade should have all needed tools, power, and equipment for the job they are doing. They are supposedly Professionals.

Keep Meticulous Records

Keep every bill, every material delivery, and every correspondence. Always communicate in writing with contractors. If you have a phone call, back it up with at least an email summarizing your conversation and get a response. Never delete an email. You might want to set up a new account just for your project. Never, ever, take “their word” for anything. ANYTHING.

Hire an Architect to view your project at Framing. 

Have a Registered Architect do a “Site Visit” once framing is complete and before interior finishes. Not only will he/she look at structural components, but this is when to catch issues potentially causing future challenges. They should give you a written report regarding any deficiencies in quality per specifications in your contract, engineered building plans and assembly instructions. This is money well spent and will potentially save you thousands over your building’s life. Give this report to your contractor and get a date by when these items will be corrected–in writing!

Do Not Pay for Anything not On-Site or Completed

Re-read this over and over. 

Make payments for materials jointly to contractor AND supplier (avoids liens). Better yet – order and pay for materials yourself!

Require written lien releases from all parties who have provided materials or labor through your contractor.

When your contractor says he or she is completed, again have your architect walk through with you. Make a written “punch list” of all deficiencies discovered and provide to the contractor. Only once all of these items have been corrected and an Occupancy Permit has been provided from your Building Department, should you make final payment.

Do Not pay ahead on a promise!

After reading all of this you may be wondering what you are paying a contractor to do, as your frequent involvement is needed in order to achieve your ideal dream outcome. If this happens to be your case, it may behoove you to pocket these funds and do it yourself!

Now, on to your questions.

From Construction Tolerance Standards for Post-Frame Buildings

“6.1 Plumbness. At the time of placement, no portion of a post should deviate from a plumb line (extending upward from the base of the post) more than 1% of the post height.”

On a 16’ eave, columns could be 1-59/64” out of plumb and still be considered within tolerance. An inch in eight feet would be outside of tolerance.

“6.5 Diagonal measurements. Corner-to-corner diagonal measurements should be taken at the finished floor and compared to determine the squareness of a rectangular area. These diagonal measurements should not deviate from each other by more than 2 inches or 0.5% of the length of the shortest side of the rectangle, whichever is greater.”

0.5% of length of shortest side would be 60 feet x 0.005 or 0.3 feet. Since this equals 3.60 inches, allowable difference in diagonal measurements would be increased from 2 to 3.6 inches. If squareness of an individual bay in same building is being checked, and post spacing is 8 feet, then rectangular area would be 8- by 60- feet, and 0.5% of length of shortest side of this rectangle would equal 8 feet x 0.005 or 0.06 feet (3/4 inch). Since this is less than 2 inches, allowable difference in diagonal measurements would be increased to 2 inches.

During construction, your overhead door openings should have had their jambs shimmed to be plumb. Interior and exterior steel panels on each side of overhead door opening should be removed, door jambs appropriately shimmed to vertical, then steel panels reordered and cut and installed to properly fit along each side of opening.
Contracts Are Boring…Until You Go To Court

I have one goal – for people to end up with structurally sound buildings they love. Follow these guidelines and you are far more likely to love your new building.

Your work starts before you sign a contract.

ASSUME YOUR PROJECT WILL END IN COURT

ASSUME YOUR BUILDING PROVIDER/CONTRACTOR IS UNTRUTHFUL

ASSUME YOUR PROJECT WILL BE MORE EXPENSIVE

ASSUME YOUR PROJECT WILL TAKE LONGER THAN EXPECTED

Failure to accept these four statements will set you up for grave disappointment.

Buy Materials Yourself

Contractors generally have no qualms about using leftover materials from prior jobs, or purchasing cheaper materials than specified. If you seriously are concerned about material quality, take control yourself. Be aware, when contractors purchase materials for your building, they will mark them up. Paying for materials yourself assures you of not having liens against your property for bills your contractor did not pay.

It is very important you make decisions on exact materials you use for your building. With each type of material, there is a high end product, low end product, and something middle grade. Educate yourself on differences between each type of material, so you can choose based on your needs. If you allow a contractor to make any of these choices for you, they can really screw you over. Picking the right materials can make a huge difference.  If a contractor picks wrong materials, things are bound to go wrong.

Only Use Engineer Sealed Plans Specific to Your Building

Your building provider or contractor may have decades of experience, but unless he or she has initials “P.E.” (Professional Engineer) after his or her name, he or she is not qualified to make structural decisions. Have any deviations from plans reviewed and approved by your building’s engineer.

A building provider or contractor who sluffs off values of a fully engineered building plan does not have your best interests at heart.

Do Not Agree to a “Gentleman’s Agreement”

Always, always, always put your agreement with a building provider and/or contractor in writing. Having everything in writing has nothing to do with trust. It helps ensure everyone remembers what agreed upon terms are.  Months later you do not want to start arguing over what was originally agreed to. Contracts should be very detailed, including all expectations for both parties. 

Read the contract thoroughly, including all terms and conditions.

Keep in mind a good contract is written to provide clear communication between two parties.  It also protects both parties, and should never be “one sided”.  From my years as a general contractor, a well thought and spelled out contract (in writing) made for smoothest projects. 

Before agreeing to any work (as well as making any payment), require a written proposal describing in plain language what materials will be provided and/or work will be done. Do not sign a contract you do not fully understand. If anything makes little or no sense, ask for a written explanation. Still feel dazed and confused, or not getting what you feel are straight answers? Pay a one-time fee so a lawyer can walk you through what, exactly, it says and alert you to vague language. Terms such as “Industry Standard” have no real definition.

A total price should be as inclusive as possible. Any unforeseeable work or unit prices should be clearly addressed (like what happens if holes are difficult to dig). Maintain all paperwork, plans and permits when the job is done, for future reference.

Familiarize yourself with contract terms.

Proposals and contracts should contain specific terms and conditions. As with any contract, such terms spell out obligations of both parties, and should be read carefully. Be wary of extremely short or vaguely worded contracts. A well written contract should address all possibilities and may very well take more than one page.

If hiring a contractor, do not pay in full until all work is completed and lien releases provided from any and all material suppliers.

A statement regarding compliance with applicable Building Codes should be included, as well as what Code and version is being used and all applicable loading criteria. If the contractor is doing building permit acquisition, it should be stated in writing and a permit should be provided prior to work starting.

Hiring a contractor? Then, standards for workmanship should be clearly specified. For post-frame buildings this would be Construction Tolerance Standards for Post-Frame Buildings (ASAE Paper 984002) and Metal Panel and Trim Installation Tolerances (ASAE Paper 054117). Depending upon scope of work, other standards may apply such as ACI (American Concrete Institute) 318, ACI Concrete Manual and APA guidelines (American Plywood Association).
Articles to follow will cover specific terms of contracts and why they are important.

Stay tuned….

Concrete Slab-on-grade Reinforcement

Long time readers will recall concrete finishing does not rank amongst my favorite building tasks. It is an art form with a gene I was not blessed with. Most pole barns, post frame buildings and barndominiums utilize slabs poured on grade.

Reader KYLE in KAPLAN writes:

“In your pole barns, do you typically use wire mesh, or rebar when doing a slab?”

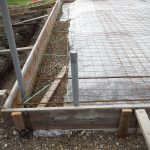
For areas where heavy vehicles or equipment may be placed, our independent third-party engineers will specify rebar reinforcement for concrete slabs on grade. Much of your need for reinforcement will be dictated by how well your site was prepared. Properly compacted sub-grades can reduce needs for reinforcement – as well compacted site is less prone to adverse effects from uneven weight distributions. Sadly, most clients and builders just do not spend enough time and effort to arrive at good site preparation.

Choosing concrete for a residential or commercial construction project is a great way to ensure you are using a strong, durable material. There are several ways to make sure your concrete has proper strength for your building. Concrete changes density when it sets, making it vulnerable to cracking. Concrete also can crack due to changes in temperature or unevenly distributed weight or stress. When pouring concrete for driveways, foundations, or floors, three common ways to reinforce concrete are to use wire mesh, rebar or fibers.

Using wire mesh is a common method to reinforce poured concrete. Wire mesh makes a square grid pattern and is laid down before concrete gets poured. Wire mesh is usually one layer of a two-dimensional grid running along length and width of poured concrete, but not height. During concrete pouring processes, you or your workers will raise previously laid down wire so it runs along concrete height (thickness) middle. This reinforcing material inside helps to prevent cracking during temperature changes and while concrete is setting.

Instead of laying down a wire mesh before concrete is poured, using fiber mesh involves mixing in different fibers such as glass, steel, synthetic fibers, or natural fibers. Fiber mesh reinforces concrete throughout its entire structure rather than just one plane. This comprehensive reinforcement protects against not just cracking due to fluctuating temperatures and changing densities from setting, but also helps prevent water from bleeding out of concrete and gives concrete’s surface a higher impact resistance.

In addition to providing a more thorough protection for your concrete pour, fiber mesh typically takes less time than wire mesh to use. This is because wire mesh has to be carefully measured to fit the pour site and needs to be held up at a certain level during pouring processes. Conversely, fiber mesh can be added straight to mix, removing the need for an extra step while pouring. Fiber mesh is also more cost-effective since there is less time involved in pouring and material is used more efficiently. There has been concern among some as this fiber mesh method can create a “hairy” finish due to some fibers protruding from the slab’s surface. However, this is only temporary since they are often laid down flat when trowels flatten concrete’s surface, and any fibers still protruding are quickly worn down or burned off by the sun if outside, or a torch if indoors.

American Concrete Institute (ACI) lists factors playing a role in how thick covering concrete must be to support rebar.

Cast-in-place concrete requires placement of wet concrete around rebar, then holding it in place as it sets and dries around it. This is usually done with rebar supports helping hold it at correct depths, but this does open it up to a certain level of operator error.

For cast-in-place concrete in contact with ground permanently, recommended covering concrete thickness is three inches.

This means for cast-in-place slabs less than 5 inches thick, in most circumstances, there should be no rebar involved. Slabs at this thickness are simply too thin to adequately cover and protect rebar while still exploiting its reinforcing nature.

One thing certainly helping is to check your local regulations, as they take into consideration local environment for optimal construction.

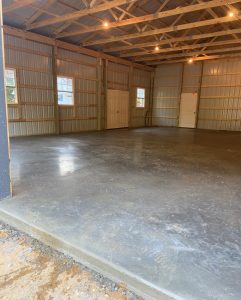
Variances in Surface of Pole Building Concrete Slab

Variances in Surface of Pole Building Concrete Slabs

Reader RON in MARYSVILLE writes:  “What is an acceptable variance in the finished level of the concrete floor in a new 24×36 pole building? It is 1/4 inch out of level, 1 1/8 inch slope, 3/4 inch hump all acceptable numbers? My floor has all of these and more.”

Like fences make good neighbors, contracts make happy clients.

You will need to go back to the contract you signed with the concrete finishing company to see what allowable tolerances you agreed to.

According to ACI (American Concrete Institute) 117-10 Section 4.8 your finisher could probably argue the point from the Commentary found in R4.8.4:

“The purpose of establishing floor surface tolerances is to define surface characteristics that are of importance to those who will be using the surface. The two surface characteristics thought to be of greatest importance for concrete floors are flatness and levelness. Flatness can be described as bumpiness of the floor, and is the degree to which a floor surface is smooth or plane. Levelness is the degree to which a floor surface parallels the slope established on the project drawings.  Two methods are identified for use in the evaluation of floor surface finish tolerances. The F-Number System uses data taken at regular intervals along lines located in random locations on the test surface. The described methods use different criteria to evaluate the as constructed data. Therefore, it is important that the Specifier select the method most applicable to the end user of the floor. “

Here is a simple ACI check for flatness:

“4.8.6.1 The gap under the straightedge and between the support points shall not exceed either of the values as listed for the specified Floor Surface Classification in Table 4.8.6.1.”

In the Table, for a conventional floor, the maximum gap for 90% compliance samples should not exceed ½ inch, for 100% ¾”.

“ 4.8.6.2 The following minimum sampling requirements shall apply for test surfaces evaluated using this tolerance method:

4.8.6.2.1 A test surface is deemed to meet specified tolerances if it complies with the maximum-gap-underthe-straightedge limitations given in Section 4.8.6.1 above. The maximum disparity between a taut string stretched between the bottom corners at the ends of the straightedge and the underside of the straightedge shall not exceed 1/32 in. at any point.

4.8.6.2.2 The minimum number of samples = (0.01) area for floor areas measured in ft2. A sample is a single placement of the straightedge.

4.8.6.2.3 Orientation of the straightedge shall be parallel, perpendicular, or at a 45-degree angle to longest construction joint bounding the test surface.

4.8.6.2.4 An equal number of samples shall be taken in perpendicular directions.

4.8.6.2.5 Samples shall be evenly distributed over the test surface.

4.8.6.2.6 Straightedge centerpoint locations for samples shall not be closer than 5 ft.

4.8.6.2.7 Test results shall be reported in a manner that will allow the data to be verified or the test to be replicated, such as a key plan showing straightedge centerpoint location and straightedge orientation.

R4.8.6 The manual straightedge approach evaluates the flatness of a floor surface by placing a 10 ft long straightedge on the floor surface and measuring the maximum gap that occurs under the straightedge and between the support points.

R4.8.6.1 Measurements should be taken between straightedge support points and perpendicular to its base. Smaller gaps between the straightedge and supporting surface are indicative of higher flatness quality. The use of this approach requires that 90% of the data samples should comply with values in the second column, and 100% of the data samples should comply with values in the third column.”

Apply the above to your floor, in lieu of specifics spelled out in your contract, if these tolerances are not met, you may yet have a cause of action.