Tag Archives: base trim

Zero Lot Line Post Frame Construction

There are occasions where the best location to place a building just happens to be right up to a lot line. Let’s face realities – if your site’s required setbacks without fire resistive construction are five feet, what is going to accumulate in this area? Most often it is either “stuff” or weeds, neither of these being aesthetically pleasing.

Reader CLINT in SPOKANE, is faced with this and writes:

“I have a unique question regarding a firewall.  In Spokane County you are allowed to build up to the property line of your neighbor given that you have a 1hr rated fire wall from both sides on the property line.  (2hrs total).  I’ll attach a copy to the code requirements.  To meet code apparently you have to use “type x” drywall on both the interior and exterior of the wall.  I understand the install and have even read up on your reference to a 3hr firewall from some time ago.  My question is, how do you weather-proof the exterior drywall? It seems that putting metal siding directly over-top the drywall could lead to moisture damage.  I’m guessing that even if it is OK for most of the wall what about the lower ground level part?  Do you need a vapor barrier or special trim/flashing to prevent splash damage from ground level. Or maybe even humidity alone could be bad?  I’ve seen what drywall does with water so that is my concern with it being only a metal layer away from the elements. Thanks for your help!”

Mike the Pole Barn Guru advises:

While your copy of Spokane County’s requirements did not make it, I am fairly familiar with them as I was once their most prolific post frame building contractor (built over 200 buildings in Spokane County in a single year).

To reach two hours, you should have two layers of 5/8″ Type X on each side of your framed wall. You also need to insure any rain or snow coming off your roof does not land in your neighbor’s yard. This will entail a slight setback to allow for gutters and you will need a snow retention system on this side of your roof (this is assuming we are discussing an eave side and not an endwall).

Start with investing in “green board” 5/8″ Type X drywall. While not waterproof, it is moisture-resistant. It is available from providers such as GTS Interior Supply in Spokane. You should use a Weather Resistant Barrier (WRB) on your exterior between drywall and steel siding. Screws for steel should be three inches in length for this wall, in order to get adequate penetration into wall girts. Base trim (aka rat guard) can be special ordered with a longer flat leg to seal off water splash up from ground. Mineral (rock) wool insulation should be used in this wall, as it is not affected by moisture.

Extended reading about NFBA’s three hour firewall testing can be found at https://www.hansenpolebuildings.com/2012/03/firewall/
A Free Post Frame Building Critique

A Free Post Frame Building Critique

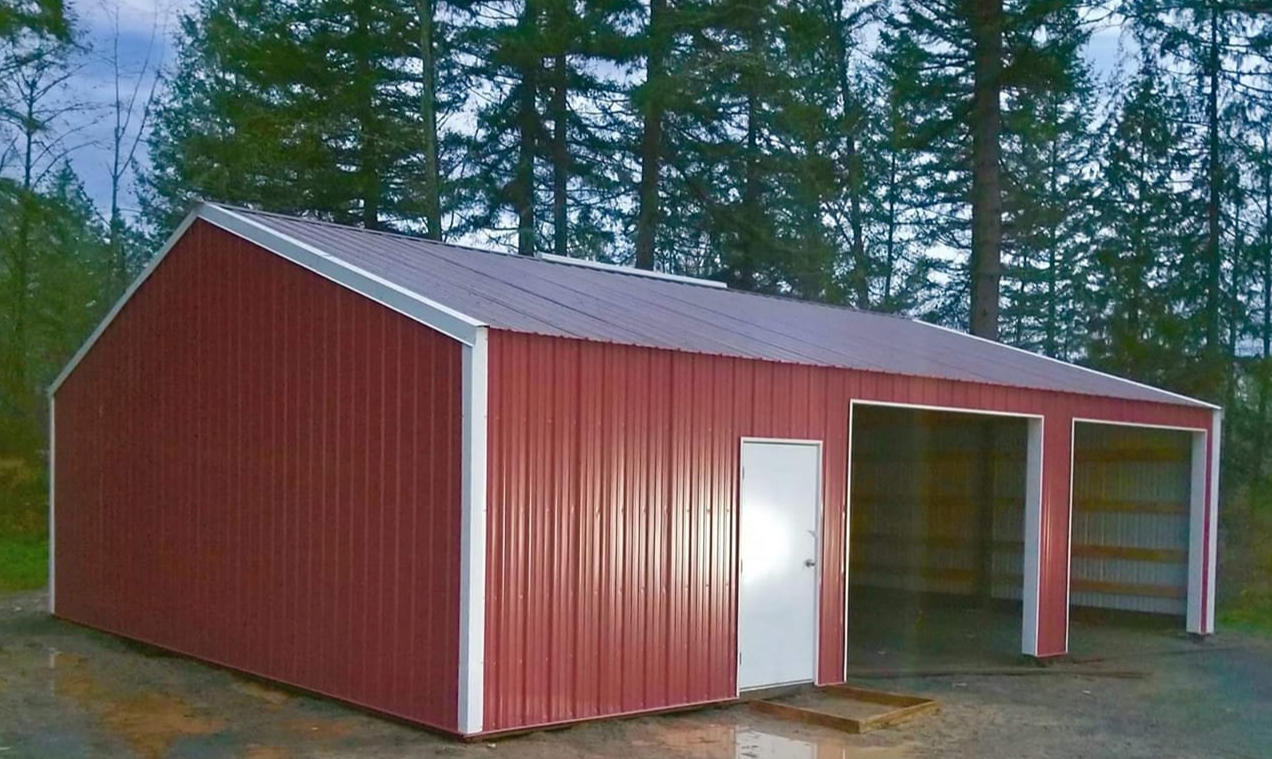
I am going to offer a free critique of this post frame building.

From a design aspect, I wouldn’t consider investing in a residential (or residential accessory) post frame building without overhangs. Not only do they make buildings look far less industrial, they also afford weather protection above doors and push runoff or slide off away from walls. With overhangs building walls stay cleaner and large snow piles sliding off roof are far less likely to dent siding and overhead doors.

Enclosed overhangs, in combination with a vented ridge, provide for adequate air flow from eave to ridge to assist in preventing condensation. 

Note there is a very small space between top of overhead door openings and roofline. This means these particular overhead doors will need to have low headroom tracks in order to open. In many cases this precludes an ability to have a remote garage door opener. Low headroom also tends to not open as smoothly. Certainly it would be impossible to have a ceiling installed at a future date (provided trusses were loaded to be adequate to support extra ceiling load).

For virtually no extra cost, overhead door openings could have been dog-eared – a 45 placed in opening upper corners. This makes building again look more like it fits in one’s backyard, rather than an industrial park.

Look at wall bottoms. There is maybe two inches of pressure preservative treated splash plank showing. Due to this, when entry door landings or aprons in front of overhead doors are poured, to avoid having concrete poured against steel siding, there will be a significant step. There is also no base trim (aka rat guard) at the base of walls to stop critters from venturing in through steel siding high ribs.

It is very easy to see nearly every roof and wall steel panel overlap. When properly applied, these laps should not show. This is a craftmanship (or lack thereof) issue.

Missing from sidewall tops is any sort of trim. Even though steel siding and roofing is manufactured (in most cases) on machines with computer controlled cutoffs, there is some slight variance. This variance is going to show either at the base of walls, or at the top. By having trim at wall tops, any slight differences can be hidden.

Structurally – wall girts flatwise on column outsides on spans such as these fail due to not meeting Building Code deflection limitations. https://www.hansenpolebuildings.com/2012/03/girts/

All of these items mentioned above would not be an issue with a new Hansen Pole Building. We seriously lay awake at night thinking of ideas to prevent clients from making crucial mistakes – we want to avoid you owning a building you will hate forever! 

Looking for a building done right? Call 1(866)200-9657 to speak with a Building Designer today – call is free and there is no obligation or charge!

Pouring Concrete Against Wall Steel


Reader CHRISTI in INOLA writes:


“Is it standard practice to pour concrete above the base trim of the building? In the attached photos you can see the red chalk line where the concrete will come up to. Help! They are coming this week to pour.”

Gentle inquirers, if you want a relatively quickly (or in this instance a 9-1-1) please include an email address to respond to. Christi has an immediate issue, however left no contact information, so all I can hope is to preempt previously scheduled posts and hope she sees this Monday.

There are a plethora of wrongs happening here, however a solution exists for every challenge.

Concrete should never be poured up against steel siding and/or trim. Never, ever.

Because?

According to National Ready Mixed Concrete Association (www.nrmca.org), “For steel embedded in concrete, corrosion results in formation of rust which has two to four times the volume of the original steel and none of its good mechanical properties”.

Steel roll-former’ warranties will be void in cases with concrete poured against steel siding.

How did this building get to this point?

This happens to not be a Hansen Pole Building, where close attention to plan details and Construction Manual instructions would have entirely avoided this challenge.

Given that the bottom of the steel siding almost entirely covers pressure preservative treated splash plank, my educated guess would be plans assumed top of concrete slab would be placed even to bottom of splash planks.  Concrete finishers appear to have not received this memo.

I am finding it difficult to believe these professional concrete guys seriously do not know better. They should have been discussing this situation with the building owner before they did anything! It appears concrete pour has been formed up so as top of interior slab and top of driveway are the same height. Rebar has been placed continuous from exterior to interior and no provision has been made for an expansion joint between. In combination I am questioning this contractor’s capability.

How to solve….

Remove wainscot panels, base and overhead door jamb trim from front of building. It appears there exists an interior steel liner, therefore remove all liner panels. Cut off wood overhead door jambs ½ inch above eventual top of concrete. Completely wipe chalk lines off all steel panels.

Have concrete finisher change rebar to be discontinuous between interior and exterior. An expansion joint needs to be placed between the  interior and exterior. Top of the driveway should be lower than top of the interior slab and driveway should be sloped away from thr building.

After concrete has well cured, reinstall interior and exterior base trim. Drip leg of base trim should remain ½ inch above top of concrete. Trim top edge of jamb trims so bottom will finish to same height as bottom of base trim. Trim top of wainscot panels so when installed bottom edge of wainscot will be 1/8” above flat of base trim when installed.

Although not ideal, bottom of liner panels can be trimmed off. If tops were to be trimmed, screw holes in steel would not align with wall framing. Same rules apply to relationship between liner base trim and liner panels.

New screws should be used when reinstalling both exterior and liner panels.

It Is Exactly the Same Building Part I

Well, maybe not exactly the same building.

In April of this year we had a client invest in a brand new 36 foot wide by 60 foot long post frame building kit package with a 16 foot eave height. Three months later, the building has been delivered, and one of the group which ordered the building sends us a quote on “exactly the same building” from a worthy competitor. And, of course, the competitor’s quote is way less expensive!

Now the competitor’s sales person advised the client the quotes were exactly the same, other than he had quoted a 25 psf (pounds per square foot) roof snow load, whereas we provided a 40 psf load, which is 60% more snow carrying capacity!

Turns out there were maybe a couple of other differences as well……

Things we have and they do not:

4/12 roof slope vs. 3/12 The steeper roof slope will look less industrial as well as more readily will shed snow.

C wind exposure vs. B wind exposure (for a detailed explanation of wind exposure please read here: https://www.hansenpolebuildings.com/2012/03/wind-exposure-confusion/).  The benefit of an Exposure C wind load is it makes the building roughly 20% stronger in resisting wind forces, than the B exposure.

12″ enclosed overhangs vs. 18″ open overhangs. Not only are enclosed overhangs far more attractive, they provide ventilation and eliminate the wonderful nesting locations for flying critters which are provided by open overhangs.

12’x14′ residential overhead door vs. 14’x12′ commercial overhead door. If the client wants to get something taller than 12 foot through the other guy’s door, it just isn’t going to fit no matter how big a run one gets at it. Residential overhead doors come with “dog eared” openings and a far more attractive in a residential setting. Here I discuss why 14 foot wide doors are not what they are cracked up to be: https://www.hansenpolebuildings.com/2016/05/14-foot-wide-doors/.

One more entry door. Insulated commercial steel entry doors with steel jambs do not come cheap, especially when they are four foot wide!

Integrated J Channel on windows. So much easier to install than having to cut four pieces of steel trim to fit around a window and have them not leak!

The reflective radiant barrier with pull strip attached adhesive tab on one side vs. Metal Building Insulation (MBI) under the roof steel to minimize condensation challenges. My personal horrors of installing MBI can be visited here: https://www.hansenpolebuildings.com/2011/11/metal-building-insulation-in-pole-buildings-part-i/.

Lifetime paint warranty on steel vs. 40 year pro-rated. Your post frame building is going to be around for a long time, might as well have the best paint warranty available to minimize the effects of fade and chalk.

Base trim – keeps those creepy crawling critters from entering the building through the high ribs of the wall steel.

Top of wall trims – Even though roll formed steel siding lengths are controlled by a computer, they do vary slightly from panel to panel. The bottom of the panels should be kept at the same height as “stair steps” at the base of the walls is quite noticeable. Easiest way to hide any variants is to place the top edge into a piece of trim which covers any fluctuations.

Jamb trim on Overhead Door– exposed wood overhead door jambs are very popular in some parts of the country, however they do turn grey and then eventually black if not kept painted.  The idea of a steel covered post frame building is to minimize future maintenance. Having to paint raw exposed wood does not meet with this criteria.

Heard enough? No? Then come back tomorrow for Part II. You won’t be disappointed!

How to Cut and Install Base Trim at a Corner

How to Cut and Install Base Trim at a Corner

In yesterday’s column, I mentioned how the base trim was improperly installed. Back in the 1990’s when I was constructing buildings, one of my building crew chiefs shared this trick with me. When properly done, it eliminates the ability of critters to climb up inside of the corner trims as well as gets rid of any sharp point which could catch the ankle of an unsuspecting small person (aka child).

Direct from the Hansen Pole Buildings’ Construction Manual, here is how to do it:

Base Trim

Install base trim straight, with “drip leg” lower edge 4” up from splash plank bottom.

See Figure 20-2

There is no base trim across any door openings.

 Hansen Buildings and the major domestic steel mills recommend steel panels not be exposed to standing water. Panels subjected to standing water may exhibit cosmetic rust staining, premature corrosion, or harm to paint coating. Wainscot, base, or lower J Channel (where “J” can catch water) conditions are conductive to exposing panel to standing water.

As such, we offer the following recommendation. The lower wall panel edge, in any condition, is not to rest directly on any trim’s horizontal surface. Rather, panel is to be spaced 1/4” from wainscot or base trim horizontal surface, 1/2” for J Channel (Ex.: above door openings). This will help keep panel’s cut edge out of standing water.

Figure 20-2: Base & Drip Flashing

For base metal cutting at corners of building See Figure 20-3

Figure 20-3: Side View Of Base And Drip Flashing

Steps to create base trim corner (“A” = the dimension of the base trim “flat”):

a) Make Cut #1 in vertical leg of base trim.

b) From Cut #1 bottom, make Cut #2 across “flat” at a 45 degree angle, stopping at bend to “drip leg”.

c) From intersection of Cut #2 with drip leg bend, make Cut #3 across flat at a 90 degree

angle to vertical leg.

d) From intersection of Cuts #1 and Cut #2, make Cut #4 along the bend between vertical

leg and flat, in direction of (and passing by) Cut #3. Cut #4 will be twice the length of

Cut #3.

e) Remove the triangle of steel created by Cuts #2, #3 and #4.

f) Make folds as indicated so B goes behind A and E is beneath D.

Voilà! You are now an expert and can teach others how to properly cut and install base trim at a corner.