Reader ANDY in HAYDEN has an end overhang challenge. He writes:
“Hello Mr Guru. I’m building a 30x40x12 post frame with 18″ eaves. My trusses builder doesn’t build drop cord ag trusses for my gable over hangs. I was advised to lower the gable truss on the corner post to allow room for my on edge 2×8 purlinings to extend over the top. I have a 16×10 garage door planned for below that over hang, will this method work. Can ladders be used?. I would appreciate your help sir. I know if I had the money I could have ordered one of your kits. Trust me I wish but I was born with a spork in my mouth and I’m just chipping away monthly on my project. Thank you for any help.”

Mike the Pole Barn Guru responds:
Most of our clients were not born with any sort of silver or plastic ware in their mouths – me either. While my brother and I did not realize it growing up, we were probably upper lower class in family income, but we were happy, our parents worked hard and we learned well from them. I have joked, “We were so poor our mother used to spray paint our feet black and lace up our toes”. It was not quite as bad – but Mother did go without socks for some time so we could have clothes.

Moving forward – there are advantages to investing in an engineered complete building kit package and not try to piecemeal. I have written about piecemealing before https://www.hansenpolebuildings.com/2014/03/diy-pole-building/. Ordering trusses can, as you have just found out, be far more difficult than it seems. https://www.hansenpolebuildings.com/2020/02/things-roof-truss-manufacturers-should-ask/
Financing is highly affordable, with some amazingly low interest rates and most suppliers have options available to delay some deliveries until you are more prepared for them.
Before you get carried away with an overhang, look at your engineered truss drawings. Guessing your building has a pair of trusses every 10 feet and a single truss on each end, it will need to be designed to account overhang weight plus any other dead loads and snow loads. To accomplish this, your end trusses should be designed with either one truss at five foot (plus a notation stating they can support an 18 inch end overhang), or have a spacing of 6’6″. If neither of these has occurred you need to contact your truss supplier for an engineered repair. It may be cheaper to use a double truss on one end (notching into corner and end columns, and purchase a correct new truss for the opposite end.
In any case, before there is any structural deviation from your engineered plans YOU MUST CALL YOUR ENGINEER. My suggestions are merely my opinion and are not to be construed as my supplying or practicing engineering. If you deviate from your engineered plans in any fashion, all liability for structural integrity falls directly upon you.
Measurements below are using this for a measure of eave height https://www.hansenpolebuildings.com/2015/02/eave-height-2/
Having taken care of loading issues in some fashion, you can lower your end trusses by 7-5/8″ to adjust for vertical component at a 4/12 slope (other slopes change this hold down dimension). This should put the bottom of your end trusses at 10′ 10-1/2″ for a 2×6 top chord truss (again at 4/12) or 10′ 8-3/4″ for a 2×8 top chord.
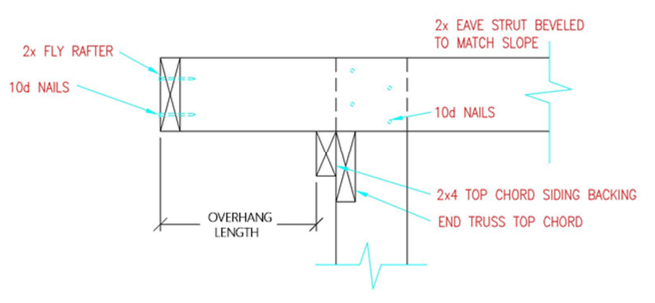
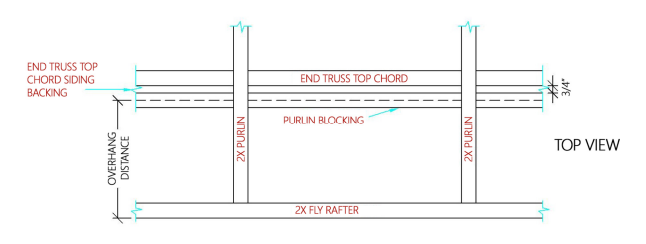
Bottom of your overhead door header should be at 10′ 5″ above grade (bottom of splash plank). This leaves 3-3/4″ only (2×8 Top chord) or 5-1/2″ with a 2×6 top chord for your overhead door header. Keep in mind, below an end truss this header carries absolutely no roof load. It exists merely to be a place for a row of screws or nails (non-steel sidings) and to be a place to attach an overhead door spring block to. If you were erecting a Hansen Pole Building, your end truss would be notched into your corner and endwall columns 1-1/2″ This allows for a 2×8 overhead door header to be installed above the top overhead door jamb and lapping onto end truss bottom chord 3-1/2″ (1-3/4″ with 2×6 top chord). Balance of end truss chords would have a 2×4 Std&btr nailed across to provide backing for siding and act as a stiffener resisting lateral loads and buckling.
Another advantage of a complete package is it should come with a detailed step-by-step assembly manual. At Hansen Pole Buildings this means 500 pages.
Your engineer can verify if you can for 2×6 top chord truss place a 2×6 as a header between top jamb and truss, or move top jamb up 1/4″ and use a 2×4.
Ladder framing nailed or screwed to the face of end truss to create end overhangs is probably not structurally adequate and it could very well sag, if not fall off.
Best wishes.


