Tag Archives: FBi Buildings

Steel Roofing Hail Dents

When I first began providing Midwest post frame building kits nearly 20 years ago, I was stymied by Michigan clients who were asking for shingled roofs, instead of steel.

Initially, I thought this must be a regional aesthetics thing. My curiosity finally bested me, so I asked about it. Simple answer – fear of steel roofing being damaged by hail! I never would have guessed.

Back then, we dealt with as many as six different steel roll forming companies. My first reaction was to reach out to each of them to ascertain if there was truth to this fear. Only one of them had ever even had a claim submitted to them for hail damage! This certainly seemed contrary to perceptions of pole building clients in Michigan.

Metal roofs are very tough and highly resistant to hail damage.  Hail will not penetrate a metal roof.  Even a new asphalt shingle roof won’t protect a building from a severe hailstorm.  In fact, many metal roofing products have the highest impact resistance and hail rating (Class 4) granted by Underwriters’ Laboratory (UL).  This rating means a product sample did not crack when the same spot was hit twice by a 2-inch steel ball. In a storm, this would translate into a huge hailstone.  As a result of metal roofing’s superior performance in hail prone areas, some insurance companies even provide a reduced rate for buildings protected by metal roofs.

Now and then I read social media posts where potential owners of steel roofing are concerned about hail damage. Pretty well universally builders chime in telling buyers to order thicker steel. But what is actually a better choice, thicker steel or material yield strength?

America’s auto industry has had these same concerns and researched it ad nauseam. Based on testing using practical techniques, empirical formulae predicting force and energy required to initiate a dent have been presented in recent years. Typically:

W = (k * Oy^2 * t^4) / S

where

  • W is denting energy
  • k is a constant
  • σyis material yield strength
  • t is panel thickness
  • S is panel stiffness

Panel stiffness depends upon elastic modulus, panel thickness, shape and geometry and boundary conditions. High strength steels offer more dent resistance at the same thickness as mild steel, or an opportunity for weight saving and equivalent dent resistance at reduced panel thickness.

Let’s look at thickness and yield strength. 29 gauge panels have a minimum bare thickness of 0.142”, 26 gauge panels 0.0187”. Nearly all 29 gauge panels have a minimum yield strength of 80,000 psi. While some 26 gauge panels share this high tensile strength, it is not universal and there is at least one very popular post frame building company roll forming 40,000 psi steel coil.

Let’s explore this formula and effects of thickness and yield.

80,000^2 x 0.0142”^4 = 260.22
40,000^2 x 0.0187”^4 = 195.65

Under these considerations 29 gauge panels are more dent resistant than thicker, softer 26 gauge panels.

For those of you who are not into math, my friends at FBi Buildings have produced this outstanding video: https://www.youtube.com/watch?v=OCTQZXwMIFE

(Hansen Pole Buildings and FBi utilize identical yield strength and thickness steel panels)

Tune in next Tuesday to find out what you can do to minimize potential hail damage for your new post frame building.
Help! My Overhead Door Jambs are Rotting!

Help! My Overhead Door Jambs Are Rotting!

I am fairly certain this problem occurs more often than I hear about. Reader DAVID in ROLLING PRAIRIE writes:

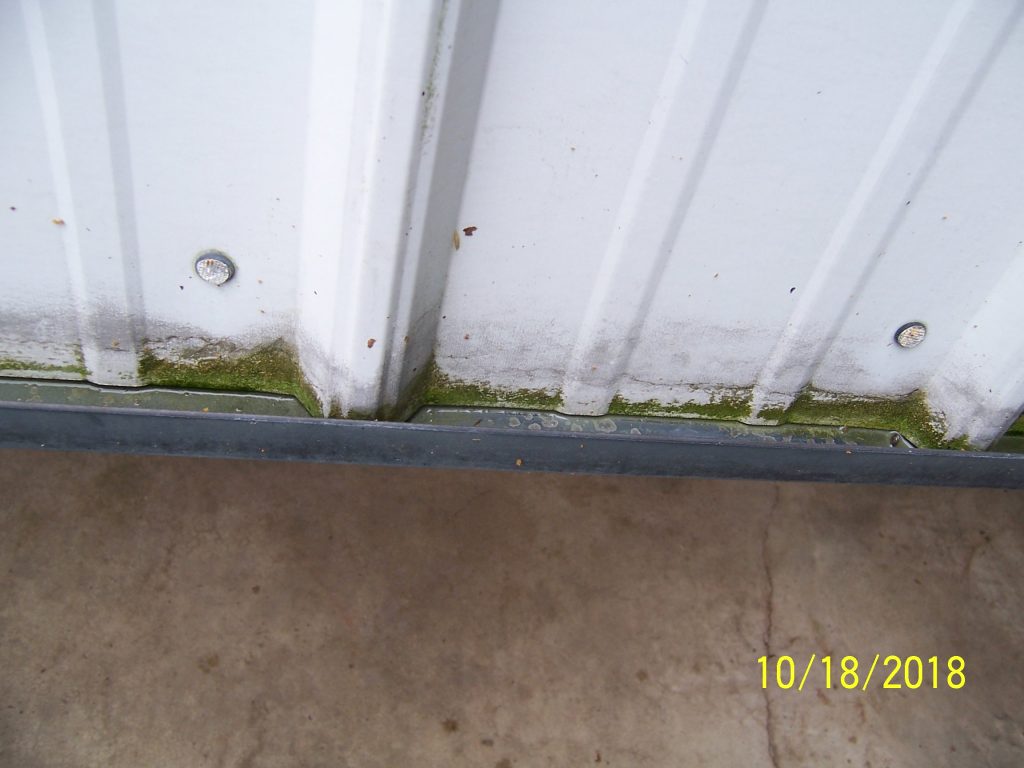
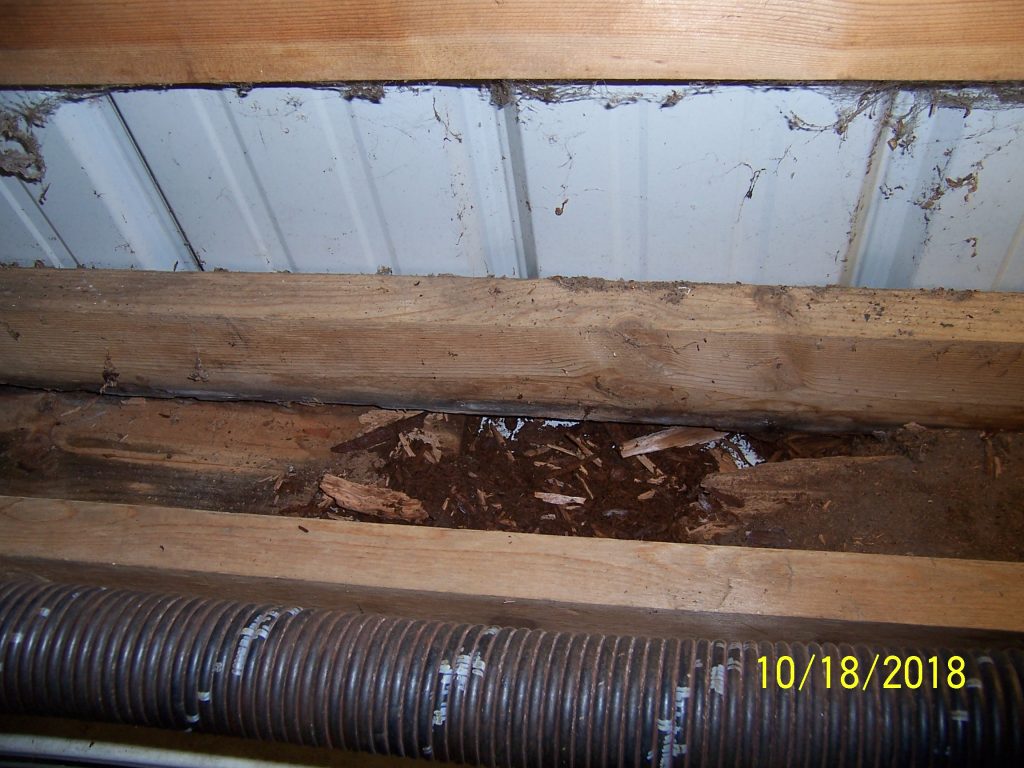
“Enclosed are two pictures showing my pole building’s overhead door. One picture is the inside door jamb that is decaying from water damage and the other one is a picture of the outside J channel and siding above the overhead door. My question what items need to be removed and what needs to be done to repair and seal the inside door jamb area? This an FBi building built in 1989. The outside upper J channel appears not to be sagging and there is no evidence of any leaks from roofing or front walls.


Thank you in advance for any help given.”

Mike the Pole Building Guru responds:

Thank you for sending photos. As you can tell from photo of outside J Channel, water has been collecting in channel, resulting in wall steel deterioration. Water most likely enters your building through one or more of – a hole or holes have rusted through J Channel, an uncaulked splice along top jamb length, or poorly executed (and possibly uncaulked) trim intersection at opening corners.

If it was my own building, I would approach a solution in this fashion:

In order to repair this area properly will involve having to remove some siding. Your building’s siding was fastened with nails, meaning it will be destroyed in removal process. Therefore, I’d remove all steel siding and trims from this building wall and replace them. Over 29 years your paint has faded and chalked significantly. For replacement I would go with Kynar painted panels (read more about Kynar here: https://www.hansenpolebuildings.com/?s=Kynar). While in steel replacement mode, I would add wainscot to this wall, regardless of whether building balance has it or not. Wainscot will enhance your building’s appearance, as well as providing short length panels easily replaced if damaged.

I would remove present overhead door jamb boards and, as a precautionary measure, replace them with pressure preservative treated lumber. Any cut ends I would treat liberally with Copper Napthenate solution. Cover the entire framed wall with Weather Resistant Barrier (think Tyvek). Wrap barrier completely around wood jambs and staple to inside wall. Wooden overhead jambs should be covered with steel trim with an integrated J Channel to receive siding. Place self-adhesive flashing tape (3M All Weather Flashing Tape 8067 or similar) between weather resistant barrier and overhead jamb trim. Avoid a splice in horizontal trim across the top, if possible. Some steel roll formers will make trims long enough for a 16 foot wide door. Overlap trims at corners so any water potentially seeping in rolls onto yet another steel piece. Place liberal caulking amounts behind and between any trim splices or overlaps, especially near corners.

When installing steel siding above door opening, cut panels so bottom edge lands 1/2″ above integrated J Channel low point. This will reduce steel panel premature decay possibility. Use form fitted inside closure strips between these panels and jamb trim flange above the door opening.

Good luck, and please do send me pictures of the final result!


Steel Roof Leaks

Welcome to Ask the Pole Barn Guru – where you can ask questions about building topics, with answers posted on Mondays.  With many questions to answer, please be patient to watch for yours to come up on a future Monday segment.  If you want a quick answer, please be sure to answer with a “reply-able” email address.

Email all questions to: PoleBarnGuru@HansenPoleBuildings.com

DEAR POLE BARN GURU: I have a 20 year old pole barn that I replaced the screws with washers…My steel roof leaks in the area half way between the top and the edge of the roof. the water runs across the two by four inside and I am not sure where the leak really is.Thanks MILES IN PRINCETON

 DEAR MILES: I can tell you how to find where the steel roof leaks….it involves two people, a ladder and a hose. One person stands inside of the building and makes lots of noise when the water starts to leak. The other ventures cautiously, utilizing proper safety procedures and equipment, onto the roof with hose in hand.

 Begin with running the hose above the spot where water has been showing up on the inside of the building. Give it at least a minute – no water, chances are the leak is not there. Go up the roof to the next row of screws and repeat. Eventually you will find the spot where the water is coming in.

 Now – how to fix it. When replacing old roof screws always go with both larger diameter shanks as well as longer parts. Putting the same size screw into a deteriorating hole is not going to be a solution to the problem. Remove the suspect screws and replace them appropriately, this should be a resolution to the problem, unless there is an actual hole somewhere in one or more of the steel panels.

 Mike the Pole Barn Guru

DEAR POLE BARN GURU: Do you have any type of financing available ???

KEITH IN COWLESVILLE

 DEAR KEITH: We have numerous options available for financing, and in many cases – your entire post frame building improvement (not just the building kit package) may be able to be financed. Monthly payments will very due to credit worthiness.  You can begin the free process at: https://www.hansenpolebuildings.com/financing/ 

Mike the Pole Barn Guru

DEAR POLE BARN GURU: Is it possible to have the top half of the gambrel roof just a bit longer so there is less of a peak and a somewhat flatter? LOST IN SPACE DEAR LOST: The beauty of a gambrel style roof is the pitch break locations (height above and horizontal distance from the eave) can be placed anywhere one’s heart desires and eye fancies.

There is a proportion for gambrel roofs which most people generally consider to be the most pleasing: https://www.hansenpolebuildings.com/2012/06/gambrel/ 

Mike the Pole Barn Guru

DEAR POLE BARN GURU: Thank you for adding me on Facebook. I live in northern Illinois. I’m looking into adding a new building on my farm. I’m thinking 72’x130’x19′. A lot of people in my area use FBI buildings and I have a sales rep coming out in a couple of weeks. I’ve read a lot of your post and it gave me a couple of questions to add to my existing list of questions. What is the biggest mistake you see people in my shoes make and do you have any links to any similar buildings? Thanks again. STEVE

DEAR STEVE: I love Facebook, it is amazing how many clients chat with me on it – or just check in to read my daily blog posts. The number one mistake I see people make is thinking the only way to get a building like this is to hire a general contractor. Don’t get me wrong, FBI (https://www.fbibuildings.com/) does a great job, I’ve known the Bahlers for decades and one of my former employees worked for FBI.

But, at the end of the day, it comes down to getting the most for your investment. If you do not have the time or manpower to build it yourself, look into buying a package and hiring an erector to assemble it. Chances are you will save 25% or more right there. At the least, get a quote from us on your materials – it will keep anyone else honest. Oh – and always buy an engineered building.

Mike the Pole Barn Guru

Pole Barn Guru Advice: Use Sonotubes

New!  The Pole Barn Guru’s mailbox is overflowing with questions.  Due to high demand, he is answering questions on Saturdays as well as Mondays.

Welcome to Ask the Pole Barn Guru – where you can ask questions about building topics, with answers posted on Mondays.  With many questions to answer, please be patient to watch for yours to come up on a future Monday or Saturday segment.  If you want a quick answer, please be sure to answer with a “reply-able” email address.

Email all questions to: PoleBarnGuru@HansenPoleBuildings.com

DEAR POLE BARN GURU: How does a do it yourself homeowner deal with a big rock when drilling holes for the poles? AILING IN ABBOTTSTOWN

DEAR AILING: When I was building, it seems like no matter how hard I tried, the last hole on the job always contained a rock the size of a Volkswagen Beetle.  The unknown with pole building construction is always what is hidden below the surface of the ground.

How to handle the situation varies depending upon the actual size of the rock, is the rock in one hole or lots of holes, how deep the hole is before hitting rock and what type of rock it is.

If the rock is under two feet in diameter, I’m probably going to try to dig it out. If the end result is a hole larger in diameter than I am willing to pay for concrete for, then I would use sonotubes. For more on the use of sonotubes with pole buildings read: https://www.hansenpolebuildings.com/blog/2013/11/sonotube/

In the case of a Hansen Pole Building kit, the holes are typically 40 inches deep, with the bottom eight inches of the hole backfilled with concrete. If I can get the hole to a depth of 32 inches of more, and hot solid rock, then I would usually call it good and completely backfill the hole with concrete to prevent uplift issues.

If just one or two holes are the issue and I can’t get to depth, renting a jackhammer is a viable option.

If lots of holes – a ram hoe attachment on a skid steer (aka Bobcat) becomes the weapon of choice.

Any deviations from the plans should involve the RDP (registered design professional – the engineer or architect who designed the building), as well as the Building Official who must ultimately approve any changes.

DEAR POLE BARN GURU: I have two 3’x6’8″ metal entry doors on my post & frame shop building by FBi.  One into the garage area and the other into the office area.  They are a tremendous loss of energy and condensation is a problem in the winter.  I would like to replace them with good, well insulated wood or fiberglass units. What would you recommend and what is the process for replacement (Any special issues regarding opening size, depth due to posts and purlins, etc.)?  Please included recommended sources.  Thanks! FRANKLY IN FRANKFORT

DEAR FRANKLY: FBi Buildings has a reputation for constructing quality buildings, but the entry doors are only as good to a point. I know the Bahler’s – Barry (retired CEO of FBi Buildings) and Ed, and one of my former employees worked with FBi Buildings for some time. FBi has constructed some very high profile projects over the years, especially churches.

It actually sounds like you may have a problem you don’t realize. In order to get condensation of any significant quantity on the inside of the entry doors, your building walls and especially ceiling are probably very well sealed, and the concrete floor in your building probably has no vapor barrier under it, as well as the slab is possibly not sealed.

If any of these are indeed happening, steps need to be taken to remediate the issue, before it becomes an even more severe problem. Sealing the concrete floor would be a good first step.

As to the doors themselves….wood doors are not insulated (other than the minimal thickness of the wood itself), so rule out this as a solution. Even if it had a decent insulated value, wood doors require a huge amount of maintenance – and if not kept painted, they quickly deteriorate.

A high quality fiberglass door could be an option, provided it is mounted in a weatherproof jamb (not wood, or wood covered with vinyl), and is thermally broken.

We’ve found the best possible solution to be a commercial steel insulated entry door with steel jambs and thermal breaks. This affords both insulating qualities and significantly reduces or eliminates condensation appearing on the inside. I have four of these on my own building in South Dakota and have never experienced any negative issues from them over the past decade since the building was constructed.

We’d be pleased to quote these doors to you – contact Eric@HansenPoleBuildings.com for pricing. They are also available with a crossbuck or six panel design, as well as with a variety of different insulated glass types.

As to the opening, while most entry doors are fairly standard sized, there are some lower budget steel doors which have smaller openings. It may be necessary for you to enlarge the opening, if this is your case. If so, the first step is to remove the steel panels and J Channel trim from around the door. At least one of the columns next to your door will be not structural (not supporting the roof). The side of this column towards the opening can be trimmed to increase the width of the hole.

If the opening must be enlarged, you will need some new J Channel trim as well – the old pieces cannot be stretched.