Tag Archives: fiberglass batt insulation

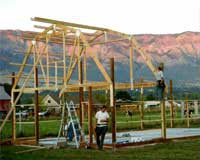
How Much Will My New Pole Barn Cost?

How Much Will My New Pole Barn Cost?

Reader CLAUDIO in LEWIS writes:

“Hello, I would like to know what would be the cost to build a pole barn building 25’x50′ with loft? Are the interior partitions and insulated walls and floors included? Is the permit application included? Is delivery and construction included in your cost estimate? Thank you.”

Mike the Pole Barn Guru writes:

If you are looking for the best bang for your building investment and a slightly different footprint will yet fit your needs, 24′ x 48′ will be a more efficient use of materials. Most often we are providing structural portions of your new pole barn (walls, roof system, siding, roofing, doors, windows, any elevated wood floors and stairs) delivered to your site. We can provide interior partition wall framing as well as fiberglass batt insulation. We do not include your permit application, however your new building investment includes full multi-page 24” x 36” engineer sealed structural blueprints detailing the location and attachment of every piece (as well as suitable for obtaining Building Permits).

Your new building kit is designed for an average physically capable person, who can and will read and follow instructions, to successfully construct your own beautiful building shell (and most of our clients do DIY – saving tens of thousands of dollars). We’ve had clients ranging from septuagenarians to fathers bonding with their teenage daughters erect their own buildings, so chances are – you can as well!

Currently (and for the foreseeable future) there is a nationwide shortage of building erectors. Many high quality erectors are booked out into 2023. We would strongly encourage you to consider erecting your own building shell.

For those without the time or inclination, we have an extensive independent Builder Network covering the contiguous 48 states (https://www.hansenpolebuildings.com/find-a-builder/). We can assist you in getting erection labor pricing as well as introducing you to potential builders.

A CAUTION in regards to ANY erector: If an erector tells you they can begin quickly it is generally either a big red flag, or you are being price gouged. ALWAYS THOROUGHLY VET ANY CONTRACTOR https://www.hansenpolebuildings.com/2018/04/vetting-building-contractor/

We would appreciate the opportunity to participate in your new pole building. Please email your building specifics, site address and best contact number to our Design Studio Manager caleb@hansenpolebuildings.com (866)200-9657 Thank you.

2021 IRC and IBC Adopt Improved Water Vapor Retarder Requirements Part II

Please see Friday’s blog for Part I of this two part blog.

FIGURE 1. New Vapor Retarder Provisions for the 2021 I-Codes (IRC shown)
NOTE: For more options and an automated means of compliance, refer to http://www.appliedbuildingtech.com/rr/1701-01(link is external) and the wall calculators found at www.continuousinsulation.org(link is external).

Improved Vapor Retarder Requirements Part II

Some of the most significant aspects of the new provisions in Figure 1 are explained as follows:

  1. A new format uses a look-up table approach to make it easier to identify all prescriptive requirements applicable to a given climate zone for a given frame wall assembly. For example, Table R702.7(2) is the launching point for determining water vapor retarder requirements and options. Other tables and text provide details for specific conditions of use.
  2. New provisions are provided for use of foam plastic insulating sheathing (continuous insulation) in combination with a Class II vapor retarder such as coated Kraft paper facers on fiberglass batt cavity insulation. See footnote ‘c’ in Table R702.7(2) which points to specific requirements in Table R702.7(4). This table compliments existing provisions for use of Class III vapor retarders while maintaining adequate inward drying potential and promoting better alignment with energy code R-value requirements for continuous insulation.
  3. The Class III vapor retarder provisions in Table R702.7(3) are expanded to apply to all of Climate Zone 4, not just Marine 4 (this applies to the 2021 IBC only). Table R702.7(2) also clarifies that Class III vapor retarders are permissible in Climate Zones 1-3 with no special requirements.
  4. The Class III vapor retarder provisions in Climate Zones 7 and 8 are differentiated and strengthened to address an inadvertent error in prior codes that treated Climate Zones 7 and 8 the same.
  5. In footnote ‘b’ of Table R702.7(2), the code specifically addressed the avoidance of so-called “double vapor barrier” walls (i.e., having Class I vapor retarder materials on both sides of the assembly). These types of walls have performed well in some conditions of use such as cold-dry climates with use of appropriate weather protection and application of sufficient exterior continuous insulation. However, there also are many cases where they have not performed well such as moist climates coupled with poor weather protection practices and inappropriate use of interior vapor barrier in warm-humid climates. One way, however, to realize the winter vapor control benefits of a Class I interior vapor retarder while avoiding the low inward drying potential problem is addressed in item 6 below.
  6. The code now recognizes “smart” or responsive vapor retarders for use in any climate zone as shown in footnote ‘a’ of Table R702.7(2). The code defines a responsive vapor retarder as any Class I or II vapor retarder (based on dry-cup water vapor permeance) that also has a water vapor permeance of greater than 1 perm (based on wet-cup water vapor permeance). When used on the interior side as a vapor retarder, they promote inward drying by “opening up” in periods or seasons where inward vapor drives occur (most prominent during spring and summer months). In the winter, they “close up” to restrict water vapor from moving into the assembly when outward vapor drives are the strongest and most persistent.

The other significant consideration is what is still missing from the IRC and IBC water vapor retarder provisions. Most importantly, the code lacks a means of controlling the vapor permeance on the interior and exterior side of wall assemblies that do not include continuous insulation to control water vapor as now addressed more completely in the 2021 codes. For example, the code provisions for continuous insulation in Figure 1 rely on compliance with underlying “insulation ratios” to ensure the inside of the wall does not reach a dew-point or high humidity levels for a sustained period of time and these ratios vary by climate. For walls without continuous insulation, the ratio of permeance of outer and inner layers of the wall must be similarly controlled by use of permeance ratios that also should vary with climate. However, such a methodology remains absent from the code. It is advisable to consider this potential omission carefully to better inform code compliance decisions. For additional information on this matter, refer to ABTG RR No. 1701-01(link is external), and the wood wall calculator(link is external) and steel wall calculator(link is external) that evaluate and implement insulation ratios and permeance ratios as applicable for walls with cavity insulation only, cavity and continuous insulation, or just continuous insulation. 

A Real Life Climate Controlled Post Frame Wall

Reader BRANDON in WICHITA writes:

“Hello Mike!  I am in the engineering field and we are just about to put up a personal climate controlled post frame building.  I have followed many of the teachings of Dr. Lstiburek on wall and roof assemblies.  I also enjoy your very detailed write ups.  I am conflicted in our assembly a bit.  Most builders here install a thin (1/8″) foam product with Aluminum foil towards the outside to act as a vapor and radiant barrier between the metal sheathing and wood frame.  That seems well and good if no additional layers are added to the wall/roof assemblies.  However, many quickly learn about the false and ridiculous R value claims of these products and add more insulation later.  Usually glass batts.  This largely concerns me because there is always another air/vapor barrier faced on the batts that would be in the interior, which creates a double vapor barrier.  

Due to this, and realizing it is nearly impossible to totally eliminate ‘some’ condensate from forming on the underside of the sheathing, we were going to use Typar house wrap on the walls AND roof between the sheathing and purlins/girts.  The product has a perm rating of about 11.  What we are targeting is an ‘air’ barrier, that is liquid proof, but still has ‘some’ permeability since some vapor would eventually get in the cavity and we need a way for it to escape.  Our assembly would follow up this building wrap with unfaced glass batts to roof/walls, then covered with the same reinforced white facing they typically use that is a vapor/air barrier and has an aluminum facing towards the outside.  

One issue faced here is the big question about climate!  Our state, as with many, have both hot/humid summers AND cold dry winters.  

I am not an advocate of Typar but selected it due to it’s toughness during install, and very low perm rating.  Not to be confused with big box store ‘generic’ wraps which are just perforated plastic! 

I have a test piece sitting with water on it right now on a paper towel and after hours, it still has not penetrated the product.  Our intention with its use is to create an air barrier on the outside as all the metal seams and corrugations can create wind washing through the glass batts, and to shed water droplets.

Your thoughts would be greatly appreciated!  We have the columns currently up so a timely response would great!”

Thank you for being a loyal reader. Your views on usage of Radiant Reflective Barriers for wall applications are spot on. Other than if people are 100% certain they will never, ever add insulation to their walls (and who can be certain about future building users/owners?) it is just an incorrect product to be used. A good, well-sealed Weather Resistant Barrier would be appropriate to use, followed by filling your insulation cavity with unfaced batts. For interior face, there is really no benefit to going to the expense of an aluminum faced product. A well-sealed 6mil clear visqueen will do everything you need it to do.

For more information on this subject, please read my Ultimate Guide to Post Frame Building Insulation https://www.hansenpolebuildings.com/2019/11/post-frame-building-insulation/.

Tstud for Post Frame Bookshelf Wall Girts

Tstud™ for Post Frame Bookshelf Wall Girts

I have been somewhat enamored of Tstuds’ potential since one of our clients asked if they would be a viable option last summer.

First I had to find out what a Tstud even was, as I had never heard of them before. Once you skip past ads at the start of this video, it gives a pretty good idea of how Tstuds work in traditional stick frame construction: https://www.youtube.com/watch?t=140s&v=mxDSulcLpAE.

Framing with Tstuds minimizes air infiltration, reduces carbon footprints and saves on electrical energy costs.

A lumber frame is obviously great for providing post frame buildings’ structural integrity. However, this same framing is also a massive weak spot in a wall insulation system – where external air can easily infiltrate. Traditionally a Weather Resistant Barrier (https://www.hansenpolebuildings.com/2016/01/determining-the-most-effective-building-weather-resistant-barrier-part-1/) is used to cover a post frame home, shouse (shop/house) or barndominium and blanket those weak points.

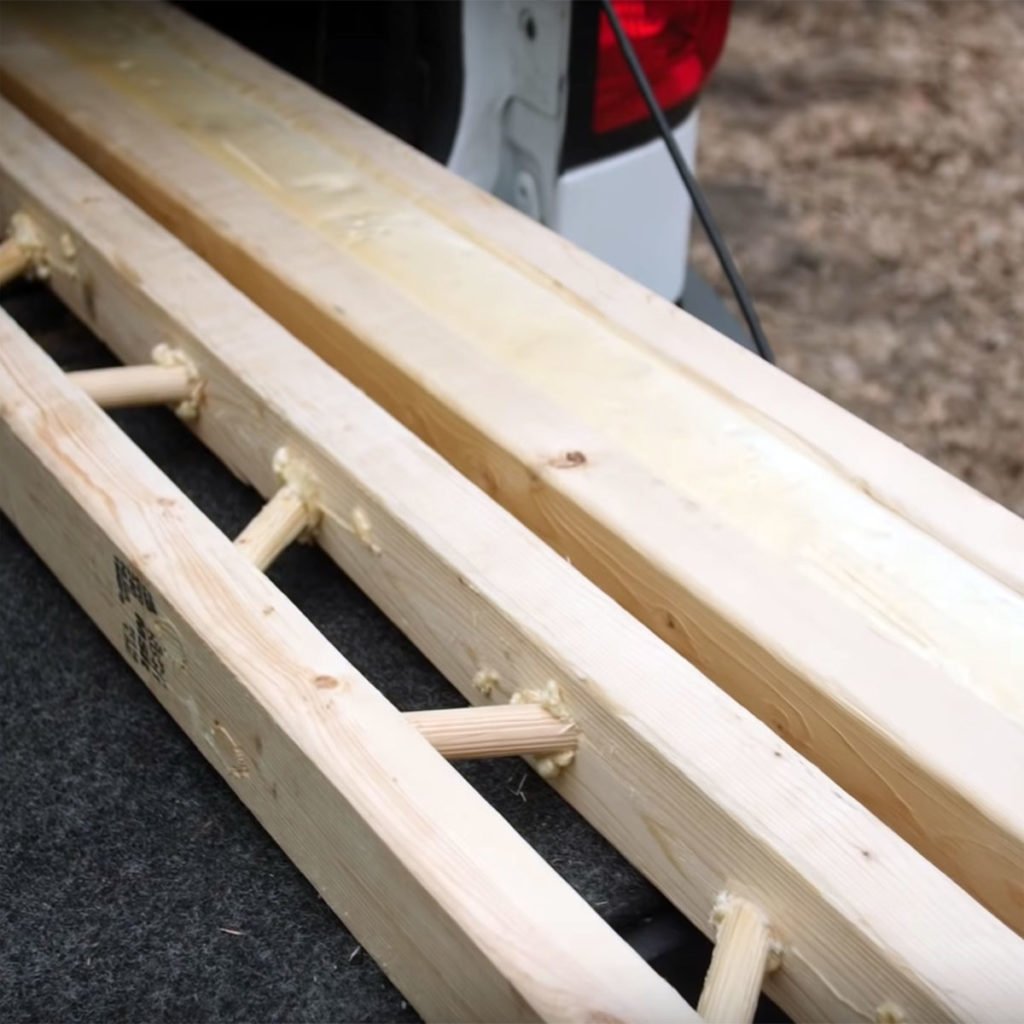
Tstuds are a new engineered framing product, essentially framing lumber with an insulated core. Tstuds consist of two long wood 2×3 members connected by crisscrossing dowels factory filled with closed cell spray foam. A 2×6 has an R-5.5 value, where a similarly sized Tstud is R-20 (or equivalent to a 2×6 wall cavity filled with fiberglass batt insulation).

Tstud’s thermal benefits are undoubtedly their main draw. Their closed cell foam core gives it roughly three times as much insulation value as a typical 2×6 bookshelf girt. By framing with Tstud wall girts and filling in wall cavities with batt insulation, there is no need to consider having to add exterior insulation.  As long term readers of this column are aware, exterior insulation, for post frame buildings, takes away or eliminates diaphragm strength of steel siding. 

Another structural benefit with using Tstuds for bookshelf wall girts is they have engineering tests showing they are up to three times stronger than a #2 graded 2×6!

Now some possible downsides, distribution and availability is highly limited. And (according to Tstud), “We are retailing about the same price as an LVL stud but we are obviously a 5 in 1 solution. In the future we will be about the price as an LSL stud”.

The Home Depot® currently has a 2x4x8 foot LVL stud at $50 or $9375 per thousand board feet. This would make a 12 foot long 2×8 Tstud wall girt roughly $150 or over 11 times more than equivalent sized dimensional lumber. Picking arbitrarily a 36 foot by 48 foot post frame building with a 12 foot eave, this would add nearly $10,000 to your cost of materials! While nifty in design, it is not for the pocketbook faint of heart.

What Home Builders Use for Insulation

With barndominiums, shouses (shop/houses) and post frame home building on a brisk upswing, a considering factor is how to insulate new homes. Becoming as close to (or reaching) net zero (https://www.hansenpolebuildings.com/2019/01/net-zero-post-frame-homes/) as possible should be a goal of any efficient post frame home design.

Rather than me just blathering about what my opinions are, I felt of interest to share what American home builders are actually using for insulation. Keep in mind these results are from traditional stick frame construction – where a plethora of redundant wall framing members often make insulating and avoiding thermal bridges much more of a challenge than with post frame construction.

For your reading pleasure:

Originally published by the following sourceABTG Staff — August 7, 2019 

The 2019 Annual Builder Practices Survey, which had more than 1,600 homebuilder participants this year, provides some powerful insight into the thermal products market in the U.S.

According to the survey, adoption of more stringent energy codes, homebuyer demographics driving the demand for lower energy bills, labor, and building material costs are prompting homebuilders to seek higher performing insulation that is also budget-friendly. Not surprisingly, these two factors seem to be tugging the market in different directions.

The performance vs. value tradeoff in the decision to specify insulation materials continued to be a key question for most homebuilders. According to the survey, some builders would use full-cavity foam insulation, if the cost was lower. The real challenge is that some homebuilders still believe fiberglass is the best bang-for-the-buck, and if they’re looking for higher energy performance they will actually invest in things like energy efficient windows and HVAC systems over upgrading the insulation.

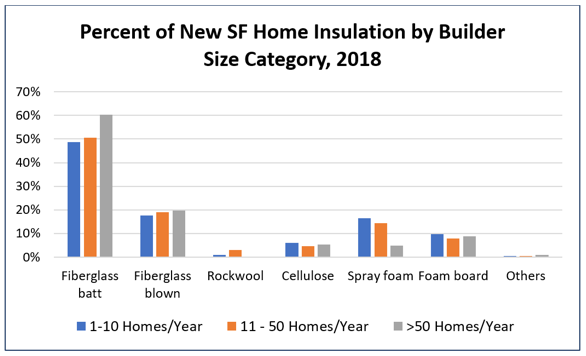
A builder’s insulation preference is also heavily influenced by geographic area, price-point of their homes, and how many units they build annually. For example, fiberglass batt has its deepest market penetration in Pacific states and lowest in West South Central states. Smaller builders (10 or fewer starts-per-year) are three times as likely to use spray foam than larger builders (more than 50 starts-per-year).

Source: 2019 Annual Builder Practices Survey, Home Innovation Research Labs

Difference in insulation usage was less variable when it came to home size as per building size. Yet, spray foam was about twice as likely to be used in luxury homes than starter homes, as an example. Conversely, fiberglass batts was more likely to be put in starter homes than luxury homes.

Will Kilz Paint Stick after a Fire?

Welcome to Ask the Pole Barn Guru – where you can ask questions about building topics, with answers posted on Mondays.  With many questions to answer, please be patient to watch for yours to come up on a future Monday segment.  If you want a quick answer, please be sure to answer with a “reply-able” email address.

Email all questions to: PoleBarnGuru@HansenPoleBuildings.com

DEAR POLE BARN GURU: I`m building a 24’x36’ workshop and I want to know if I`m putting materials in the right place/order. I have 2×6 constructed walls with NO osb, 12’ high that are bolted to my slab. I plan on wrapping the walls in house wrap, putting my 2×4 girts on top of the house wrap and then metal siding over the girts. I`m wondering if 1 ½” space created between the metal siding and the house wrap would pose a problem?

On the inside I plan on fiberglass insulation up against the backside of the house wrap, then vapor barrier and then metal interior panels. IS this ok?

As for the roof, I was reading on your site about the reflective insulation from “www.buyreflectiveinsulation.com” and I went ahead and got the A1V and I plan on putting that down on top of my 2 foot spaced 4/12 trusses and then roof metal. These are common trusses so I will have a ceiling with blown in insulation on top of that. I`m just trying to avoid condensation, I will have 36’ breathable soffits on each eave and I am putting vented closure strip on the peak. I plan on heating the building on an “as needed” basis and I live in SE Wisconsin.

Is there anything wrong with the way I`m going about this? Is the house wrap on the walls even necessary? I`m doing all the work myself and trying to save as much money as possible but I know I only have 1 shot to get it right.

Thanks for your time. RICK

DEAR RICK: It sounds like you have studwall framed your workshop. If this is the case and your walls are 12′ tall, I hate to be the bearer of bad news – you do have a structural problem. Table 2308.9.1 of the Code (https://publicecodes.cyberregs.com/icod/ibc/2012/icod_ibc_2012_23_par170.htm?bu2=undefined) limits the height of load bearing stud walls to 10′.  Before going further, it would behoove you to consult with a Registered Professional Engineer to resolve the structural issues.

Moving forward –

With insulated walls, housewrap is an excellent idea and the 1-1/2″ space between it and the siding should pose no negative issues.

My personal choice for interior wall finish is sheetrock – it is less expensive than steel, absorbs sound, easier to attach things like shelves, cabinets, work benches, etc. A dent in a steel panel cannot be repaired, a dent or hole in sheetrock is easily fixed.

On your roof, with trusses two foot on center, you will need to lay 2×4 flat on top of the A1V and the trusses. The 1-1/2″ dead air space created by the 2×4 will actually improve the thermal efficiency of the system. If you have not yet ordered trusses, I’d recommend buying ones with raised heels to increase energy efficiency and reduce potential heat loss: https://www.hansenpolebuildings.com/blog/2012/07/raised-heel-trusses/

Be sure to use screws to attach the steel and use the right size screws in the right locations: https://www.hansenpolebuildings.com/blog/2014/12/screw-placement/

Mike the Pole Barn Guru

DEAR POLE BARN GURU: Have a pole barn that we used the prefinished pole barn steel panels for ceiling. Had an auto fire close to the ceiling. Replaced buckled panels and had a ServPro (https://www.servpro.com/) fire restoration company clean rest of panels of loose soot. They say Kilz paint primer will stick and seal the smoke residue so paint will adhere and stay. What do you think and recommend? ANTHONY IN MEDFORD

DEAR ANTHONY: With a fire producing extreme enough heat to have buckled steel ceiling liner panels, I am hoping your insurance company had a Registered Professional Engineer do an inspection of the roof trusses to ascertain if they were damaged. While the wood trusses may not have been exposed to the direct flames, the heat from the fire could have caused the lumber to shrink away from the steel truss connector plates and/or the plates could have lost their temper from the heat. If they did not, I would suggest it be done now, before a problem occurs which was unforeseen.

Provided the roof system was designed to support the weight, I would originally have recommended removal of all of the steel liner panels and replacing with 5/8” Type X Drywall. Read more about why here: https://www.hansenpolebuildings.com/blog/2013/08/steel-liner-panels/

The 5/8” Type X drywall is also fire resistant.

As you are past this point – Kilz paint (https://www.kilz.com) does make products which will adhere to the steel liner. I’d recommend a visit to the paint expert at your local The Home Depot®, where they can give you not only the proper advice on which Kilz®paint product to use, but also can make you a smoking hot (pun intended) deal on it!

Regardless of what product is used for painting, it is essential to properly prepare the steel surface prior to priming with Kilz paint. More information on repainting steel panels is available at: https://www.hansenpolebuildings.com/blog/2013/01/repainting-steel/

Mike the Pole Barn Guru

DEAR POLE BARN GURU: Good morning, Guru,I am an engineer and I am looking at a pole structure approximately 40 years old. First, is there a formula (given all the variables) to estimate the vertical load capacity of the poles? Second, being 40 years old, what is the likelihood there are footings at the base of the poles? Was it common practice to use footings in the mid-70s?

The sooner you can respond, the better.

Thanks in advance for your help! BOB IN MADISONVILLE

DEAR BOB: There is a formula which will calculate the capacity for the columns – which must resist both bending and compressive loadings. We’d be happy to check them for you, for free.

We would need to know the actual dimensions of the columns, as well as the species and grade, and their on center spacing.

From the building we would need to know the eave height (https://www.hansenpolebuildings.com/blog/2015/02/eave-height-2/), width and length, as well as roof slope and whether the columns are adequately tied into the concrete slab or not. We also would need to know if the siding and roofing are properly fastened so as to provide a diaphragm, as well as the materials used. Also is building fully or partially enclosed and are doors designed to support wind loads.

Digital photos of as much of the structure as you can provide would prove helpful.

Climactic information we would need includes ground snow load, use of building, if building is heated, design wind speed and wind exposure.

Lots of variables to consider, all of which we have checked by our proprietary program every time we even quote a building.

Footings – as most pole buildings currently being constructed have inadequate footings, do not count on this one being an exception. If you are potentially going to have a liability for them, I’d certainly recommend digging to the bottom of one or more of them to ascertain what indeed is really there.

Mike the Pole Barn Guru
Are the Poles Close Enough?

Welcome to Ask the Pole Barn Guru – where you can ask questions about building topics, with answers posted on Mondays.  With many questions to answer, please be patient to watch for yours to come up on a future Monday segment.  If you want a quick answer, please be sure to answer with a “reply-able” email address.

Email all questions to: PoleBarnGuru@HansenPoleBuildings.com

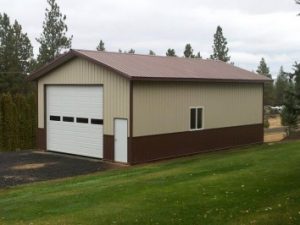
DEAR POLE BARN GURU:How close is close enough for pole placement? After setting and leveling poles to the string, the poles on one side of the barn are 1/2″ off (lengthwise) from the other side. Is this close enough? KARMIC IN KANSAS CITY

DEAR KARMIC: There actually exists a document entitled, “Accepted Practices for Post-Frame Building Construction: Framing Tolerances”. In the document, in Section 6.4: “Wall length. In rectangular buildings, the overall length of opposing walls should not differ by more than 2.0 inches.”

In my humble opinion “only” two inches would be a HUGE difference. Variations such as this need to be hidden somewhere and two inches would be huge.

In your particular case, if the poles are merely placed in the holes and braced, I would recommend adjusting a corner column to get equal overall lengths.

If the columns have been set in concrete, it is best to then make the overall dimensions at the roofline correct. This will make squaring up the roof to install roofing far easier. In the event this circumstance is the choice, when it comes time to do the siding, plumb the corner(s) which are most likely to be noticed.

On the out-of-plumb corners, the edge of the corner trim will not align with the steel ribs (there will be a ½ inch variation from top to bottom). Most people will never see it – but putting it on the least viewed corner reduces the probability.

DEAR POLE BARN GURU: Hi: How do I install fiberglass batts of R 19 in my walls of pole barn without touching the metal walls? Thanks. ART IN ALBION

DEAR ART: The easiest way would be to install a quality housewrap over the outside of the wall girts and under the wall steel before siding it.

In the event your pole building has been sided, there really is not a negative effect in the event the fiberglass happens to be in contact with the wall steel. It IS essential to have a vapor barrier on the inside of the insulation which provides a total seal. If the vapor barrier is not completely sealed moisture will escape into the wall cavity, and be trapped by the steel siding. When the siding is cold enough, condensation will form, saturating the fiberglass and reducing its efficiency.

You may want to read more on climate controlled pole buildings at:

https://www.hansenpolebuildings.com/blog/2012/04/climate-controlled/

DEAR POLE BARN GURU:What about putting the concrete up to the slab level?

CONCRETING IN CANTON

DEAR CONCRETING: I will assume your question is in regards to backfilling the columns. If so, there is no documented negative reason (lots of old wives’ tales) to not fill the holes entirely with concrete – other than cost (concrete can become expensive backfill). It will make your building very resistant to uplift forces.

Dear Pole Barn Guru: How Much is Truss Weight??

New!  The Pole Barn Guru’s mailbox is overflowing with questions.  Due to high demand, he is answering questions on Saturdays as well as Mondays.

Welcome to Ask the Pole Barn Guru – where you can ask questions about building topics, with answers posted on Mondays.  With many questions to answer, please be patient to watch for yours to come up on a future Monday or Saturday segment.  If you want a quick answer, please be sure to answer with a “reply-able” email address.

Email all questions to: PoleBarnGuru@HansenPoleBuildings.com


DEAR POLE BARN GURU: Hello, I’m an engineering student doing a research about sustainable buildings, can you tell me the approximate 20′ metal truss weight and 24′ wood truss weight?

Please I need the answer urgently. CALCULATING IN KALAMAZOO


DEAR CALCULATING: Nice to have engineering students reading this column!

Having been given no parameters for load carrying capacity, truss spacing or roof slope, leaves me just winging out an answer.

For wood trusses with a total load of around 180 pounds per lineal foot (30 pounds per square foot spaced one at six foot or two at 12 feet), a single 24 foot span 4/12 slope truss weight should be about 125 pounds.

I’ve never dealt with steel trusses, however I was able to find several formulas, as well as a table for calculating the steel truss weight, W being weight per horizontal square foot, S = span in feet, P = capacity of truss in pounds per horizontal square foot, and A the distance center to center of trusses in feet:

Charles Evan Fowler, P. E., for Fink trusses:

W = .06S + .6 for heavy loads; W= .04S + .4 for light loads.

H. G. Tyrrell, P. E.:

W = .05S+ distance center to center.

C. W. Bryan, P. E.:

W = .04S + 4.

M. S. Ketchum. P. E.:

+ For scissors trusses increase one-third.

Weight Per Square Foot Of Roof Surface For Steel Trusses

6/12 Slope 4/12 Slope 3/12 Slope
Up to 40 ft. 5.25 6.3 6.8 7.6
50 ft. 5.75 6.6 7.2 8.0
60 ft. 6.75 8.0 8.6 9.6
70 ft. 7.25 8.5 9.2 10.2
80 ft. 7.75 9.0 9.7 10.8
100 ft. 8.5 10.0 10.8 12.0
120 ft. 9.5 11.0 12.0 13.2
140 ft. 10.0 11.6 12.6 14.0

As you can see – lots of opinions on the steel truss (as are probably huge variants in their configuration).

DEAR POLE BARN GURU:We’ve just had a 40’x60′ steel pole barn constructed (in the woods) for storing classic cars. We had the builder install and frame fiberglass insulation in. We’re installing OSB wall panels ourselves. Wondering if we should cover the fiberglass with ‘Visqueen’ for vapor barrier or would we be better served by installing foil faced OSB panels?

Thanks CONCERNED IN KOKOMO

DEAR CONCERNED: Most often fiberglass batt insulation which is used in walls has a paper (or “kraft”) facing on the inside, which when properly installed serves as the vapor barrier. If unfaced batts were used, then a clear plastic vapor barrier should be installed on the inside face. Foil faced OSB panels are designed to be placed below roofing to assist in keeping attics cooler in warm climates, it is not designed to be or replace vapor barriers in walls.