Solutions! The Key to a Successful Post Frame Building
When one considers the tremendous number of individual components and the thousands of people who touch these pieces from concept to jobsite, it is amazing anything ever gets built!
I ran some numbers once – tracked the rough path of all of the parts for a small post frame garage. As best I could tell, in excess of 4,000 people were in some way responsible for getting those pieces successfully to the client.
The true mark of a construction project success is not in everything going perfect.
Success is measured in how the things which did not go perfect got solved.
Here is a real life scenario…..
A client invests in a new post frame building which has “attic” trusses. These would also be described as “bonus room” trusses. The client also ordered a pair of windows for this same building.
 As is true in most of life – communication breakdown is what creates most challenges. There is a passing chance the client and his Building Designer discussed where these windows were to be located in his new post frame building. As the great majority of clients know they want windows, however are unsure of exactly where they will be placed on the finished building, we went with them being “field located”. The purchase order and invoice for the building did not specify a window location.
Therein begins the breakdown. Client wanted a window in the center of each end of the bonus room.
Plans are produced and approved by the client, which did not show the windows located in the center of each end of the bonus room. The client, admittedly, was not overly skilled at reviewing plans, and as such did not notice there was no provision on the plans for the windows to be located where he truly wanted them.
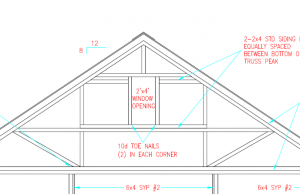
Now this particular structure, like most Hansen Pole Buildings, has a prefabricated roof truss on each end of the building. The saving grace – the end trusses are notched into the columns by 1-1/2 inches and flatwise 2x framing is placed on the face of the truss, in the field, to allow for the attachment of the endwall steel.
Here is a solution, utilizing the siding backing to frame in the window:
“The portion of the window inside of the flange is approximately 1-7/8″ thick (the balance of the window thickness is incorporated in the flange and integrated J Channel of the window itself). As the framing on the face of the truss is 1-1/2″ thick, it will entail having to place some 3/8″ thick shims somewhere in the assembly. I would suggest putting them between the members which will surround the window, and any nearby end truss members which support the underlying framing. This will create a gentle curve in the window supporting framing members, which the steel will easily follow and be imperceptible to the eye from the ground.”
The real keys to success – first, make sure everything which is important to you about your new post frame building is spelled out clearly in the ordering documents. Do not leave anything to chance, or chances are it will pose a later challenge.
Second, and most important, invest in a post frame building kit package from people who have actually built post frame buildings and who have been involved in enough projects to be able to come up with solutions to challenges which work!


