Tag Archives: in-floor heat

Cabin Insulation Follow Up

Cabin Insulation Follow Up

First Winter Heating Bill

Mike’s loyal readers may recall that I was privileged to be able to write several blog articles on the development of my plans to build my fishing cabin.

https://www.hansenpolebuildings.com/2019/03/development-of-my-cabin-plans/

https://www.hansenpolebuildings.com/2019/03/pole-barn-cabin-part-ii/

https://www.hansenpolebuildings.com/2019/03/participating-in-ricks-post-frame-cabin-planning/

https://www.hansenpolebuildings.com/2019/04/my-pole-barn-cabin-part-iii/

https://www.hansenpolebuildings.com/2020/10/my-fishing-cabin-is-finished/

During my time as a Building Designer, I strongly emphasized to all of my clients that they should have an insulation plan for their building BEFORE they order the building!  The reason being that any design elements for the insulation, such as 2×8 walls or 2×10 roof purlins can be designed prior to ordering.

One of the blogs went into detailed information on how I insulated the building in which I said tongue in cheek that the winter will tell the tale of how well it worked.  For that reason, I thought that I’d send in the “Paul Harvey” version.

This link tells you how and why I insulated it the way that I did, with pictures:

https://www.hansenpolebuildings.com/2020/06/fishing-cabin-insulation/

Now for the rest of the story

On December 15th, 2020 I had the LP company top off my tank a little extra.  My driveway is 700 feet and I did not intend to plow it and wanted to be sure that there was ample gas to get through the winter.  They filled it to 92%.

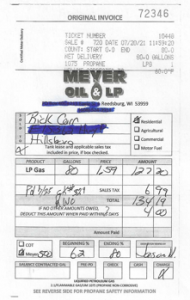
They did not refill the tank until 7-20 21.   They filled it from 62% to 80%!  It only took from 92% down to 62% to heat the building ALL winter! 


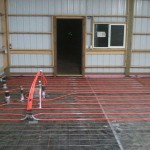
I would leave the thermostat set at about 50 degrees and when I would come out, the in-floor heat would have a hard time getting the building warm.  No problem.  The wood burning stove would get the temperature up to 70 in less than two hours and the in-floor heating would keep it there.

All in all, I am very happy about it!  Less than $200 to heat for the whole winter and it got cold!

When planning your building be sure to have the insulation plan prior to ordering the building!

Radiant Floor Heat, Treated Posts, and “Missed” Screws

Today the Pole Barn Guru answers reader questions about radiant floor heat, properly treated posts for in ground use, and how to fix screws that did not hit the framing materials.

In Floor Heat System InstallationDEAR POLE BARN GURU: I am trying to make a decision on radiant floor heat. The internet has a lot of opinions from a lot of people who are trying to sell one type or the other. Where can I find unbiased information to make an educated decision between electric and hydro systems and how can you get budget estimates for each? BILLY in GOODLETTSVILLE

DEAR BILLY: I have found your best information is going to come from www.RadiantOutfitters.com 1.877.855.2537 they will give you the straight story and not try to sell you anything you do not need.


DEAR POLE BARN GURU: I live in Louisiana. High humidity, normally higher temps. Perfect for the termites. Am I correct in saying that the posts will be placed in the ground? No termites will eat those posts as long as the post is properly treated. How can I guarantee I am getting properly treated posts, because no company will say they have not properly treated wood? TODD in PONCHATOULA

DEAR TODD: For ease of construction and best structural integrity properly pressure preservative treated columns are best embedded into ground. To insure you are getting properly pressure preservative treated wood for structural in ground use, look for end tags on columns with UC-4B on them. UC-4A treated lumber is not adequate for structural in ground use. Pre-construction termite treatment is also an excellent preventative plan: https://www.hansenpolebuildings.com/2019/09/pre-construction-termite-treatment/.


DEAR POLE BARN GURU: I had a contractor build a small metal building that I plan to make my house. After he left I noticed several places where he screwed through the sheets but missed the metal c channel, leaving holes. Some of them are in the roof and some in the walls. I called him back for warranty and his crew used silicone to patch it. So later I sent him a text about it. He said he would come by so we could discuss it. It’s been a month and I still haven’t heard from him. What can I do to get this fixed and how should he go about the repair? CINDY in TYLER

DEAR CINDY: Your challenge is why I always encourage clients to require a performance bond (https://www.hansenpolebuildings.com/2019/11/performance-bonds/). You also should have withheld final payment until a thorough inspection of your building was done, including a punch list of non-conforming issues. Some states require contractor registration, including bonding to give client’s a financial recourse against defective workmanship. Sadly for you, Texas is not one of these states.

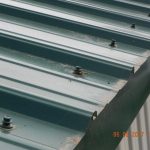
Silicone is not an approved fix for ‘shiners’ (screws through steel into air) or holes in roofing or siding. Your only approved fix is to put screws through steel cladding into a solid block of wood on inside.

Your quickest way to get action is going to be to spend a hundred dollars or so to have a construction attorney send a registered letter to your contractor, demanding satisfactory repairs within a reasonable time frame. If this builder has no real assets, chances are he will ignore it entirely, as he knows he has little to fear from losing in court. Ultimately you may need to hire yet another contractor to do your repairs.

Best of luck to you.


Vapor Barriers in Post Frame Construction

Purpose of a vapor barriers

Vapor barriers are designed with one purpose: to halt the movement of water vapor and prevent it from getting into the wrong parts of your building assembly. Usually, this means protecting insulation or building materials from moisture damage.

Any material with a U.S. perm rating of less than 0.1 perm is considered a vapor barrier. Materials with higher perm numbers (more permeable) are classified as vapor retarders. Polyethylene plastic sheeting (poly) of 6 mil thickness or greater is typically used as a vapor barrier. Commonly used 6 mil poly is 0.006 inches thick and has a 0.06 perm rating.
It’s important to note the difference between vapor barriers and air barriers. Air barriers, such as Tyvek house wrap, are designed to stop the flow of air, but will allow water vapor to pass through.

Vapor barriers in walls and ceiling

If your post-frame building is insulated, installing a vapor barrier on the inside (warm side) of the insulation will protect your walls and ceiling from moisture. The greater the temperature gradient between the inside of the building envelope and the outside, the more readily the water vapor in the warm, inside air will condense onto a colder surface. For this reason, vapor barriers are most important in cold climates.

For sealing walls and ceilings, 6 mil or 10 mil reinforced poly is typically used. Depending on the building applications, fire-retardant poly may be needed.

Any holes or gaps in the barrier will allow moisture to pass through and render the barrier ineffective. Butyl tape or a butyl-type sealant should be used to affix the vapor barrier to the floor. Any penetrations, such as light outlets and ducting, must be sealed as well. Seal seams with vapor tape and allow for at least 6 inches of overlap.

Interior wall paneling is typically installed on top of the vapor barrier to protect the wall assembly. For ceiling insulation, however, an opaque white poly on the underside of the trusses can provide an attractive finish and brighten up the building interior.

For insulated buildings in the Southern U.S. or other hot-humid climates, vapor barriers are typically installed on the outside of the building envelope, under the exterior siding. Water vapor diffusion is not as big of a concern in these climates, but if the building is going to be air-conditioned, the pressure difference between the warm outside and the cool inside can be significant.

Even in post-frame buildings without insulation, vapor barriers can keep out drafts. If the building has leaks at joints, an interior vapor barrier can help seal the building.

Radiant barriers in post-frame buildings
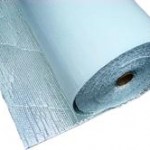
Reflective InsulationRadiant barriers are designed to reduce radiant heat gain inside a building when the sun heats up exterior walls or roofing. They are made using shiny foil and have high reflectivity. Radiant barriers installed just underneath roofing or exterior walls will make its biggest impact by reducing summer cooling loads in buildings with high sun exposure.

A radiant barrier can double as a vapor barrier, depending on whether it is perforated or non-perforated. Perforated radiant barriers will allow water vapor to pass right through. There are many situations where a perforated radiant barrier is preferable to ensure moisture does not get trapped in the building. In residential attics, for example, a radiant barrier in the attic floor should be perforated so water vapor does not condense in the ceiling.

Vapor barriers under slab

For slabs on grade under post-frame buildings, a vapor barrier should be placed between the concrete slab and the ground. This will prevent water vapor diffusion through the slab, which could lead to cracking, spalling, or pooling of water inside the building.

Poly sheeting to partition space

If one part of the building is going to be used as a workshop, for example, heavy-duty poly sheeting can be used to create a temporary partition to prevent dust, debris, or moisture from entering the other parts of the building.

Purchasing vapor barrier supplies

Polyethylene vapor barriers are available at most stores that stock building materials. However, not all poly sheeting is created equal. Recycled “regrind” polyethylene could contain impurities such as dirt, debris, and moisture, and be more brittle as a result. When possible, purchase virgin polyethylene sheeting

A vapor barrier with a tear or leak will be greatly diminished in effectiveness. Americover offers durable string-reinforced vapor barriers that are made from 100% virgin polyethylene, ensuring maximum integrity and tear-resistance. 6 mil, 10 mil, 15 mil and beyond are available directly from Americover. Remember to pick up necessary sealants such as vapor tape and butyl tape.

Thank you to Tevan Ann Riedel for this guest blog post.

Tevan Ann Riedel

President, Americover

Tevan first founded Tri Synergy, a pioneer in sustainable solutions for the biotech market in 1989. By 1993, the company had expanded its horizons to include plastic sheeting solutions and became Americover.  Serving multiple industries worldwide from agriculture to construction, the company has experienced 20% year-over-year growth for the last 10 years alone. Today, Tevan and the team continue to innovate and develop new sheeting solutions to best leverage modern technology and meet industry demand.

Pole Barn Guru Bonus Questions

Mike the Pole Barn Guru would call this his “bonus round” of questions for the week.  Mike is currently sitting at his son’s bedside at a local trauma care hospital.  While waiting for Brent’s surgery following a late night crash on his motorcycle, Mike is keeping vigil over his son.  He will be ok, but Mike the Pole Barn Guru is like Papa Bear and isn’t leaving Brent’s side until he is assured – all is well and the surgeon kicks him out.

On to Mike’s bonus round of questions…

DEAR POLE BARN GURU: I am writing in regards to the article on insulating and heating your building with in floor heat. How and when did you install the vertical insulation? From what I am reading it needs to go below the frost line. Any help is greatly appreciated! SETH

DEAR SETH: The vertical insulation can be placed at any time prior to pouring a concrete slab inside of the building. Although it could be run down to below the frost line, it is seemingly much easier to follow the guidelines in the NAHB (National Association of Home Builders) “Frost-Protected Shallow Foundations” brochure at: https://www.toolbase.org/PDF/FieldEvaluations/NAHB_fpsf.pdf

DEAR POLE BARN GURU: Thanks for the quick response! Could you put that into more simple terms for me? The building is going up before the concrete and insulation. I’m just trying to make sure I’m not doing this out of order. Thanks again! SETH

DEAR SETH: Here is a rough outline, you must consult with the RDP (Registered Design Professional – engineer or architect) who designed your building for final approvals.

Dig a trench around the perimeter of the building – from the inside line of where columns will be placed, extending outward past the building line by at least the horizontal dimension shown in the Table on Page 8 of the NAHB brochure. The trench should be 28 inches in depth below the future top of your future concrete slab. Auger the post holes for your building, per plan, with the bottom of the holes being no less than 16 inches in depth below the bottom of the trench. Place the columns in the holes, suspended so the base of the column is eight inches above the bottom of the hole. Back fill the holes with premix concrete up to the bottom of the trench.

At a minimum, completely frame the roof of the building and install the roofing. Ideally frame the walls and install siding.

Place four inches of washed gravel in the bottom of the trench. Place two foot widths, of the appropriate R-value (or greater) from the table, vertically on the inside of the pressure preservative treated splash board, with the top of the insulation at the level of the top of the concrete floor. Install Place horizontal insulation (again per the table). Back fill above the horizontal insulation with compactable material. Pour concrete slab over previously prepared and properly compacted surface. Good Luck and let me know how it all turns out!

Mike the Pole Barn Guru

DEAR POLE BARN GURU: Since I need to finance this residential build: I need to know if there is a bank in PA that will legally lend me money to build this? I have heard that banks will not lend money to for residential homes. JON IN SUGAR GROVE

 DEAR JON: The issue is not one of legality – it is going to be finding a bank which will lend to an individual as a “construction loan” to an individual (as opposed to a production home builder), for a home to be constructed on what may very well be unimproved property. Rather than reinvent the wheels, here is further information on construction loans: https://www.wikihow.com/Get-a-Construction-Loan-%28US%29

 When applying for any loan involving a post frame (pole) building residence, I would encourage the description of the home to include language such as: “wood frame with a pressure preservative treated wood and concrete foundation”. Trying to get the average lender and appraiser to wrap their heads around post frame housing is usually an exercise which involves more than a fair amount of education being done by you.

 Mike the Pole Barn Guru

DEAR POLE BARN GURU: I am wanting to install two fireplaces in my new Hansen Pole Building residence. Can you provide the framing materials and custom finished openings necessary for them? BLAZING

DEAR BLAZING: Yes. We will just need to have you supply the horizontal width between framing members, as well as the required height above grade (bottom of pressure treated splash board). A pressure preservative treated column will be located on each side of the opening to provide the needed rigidity as well as resistance to wind and seismic forces.

Mike the Pole Barn Guru

DEAR POLE BARN GURU: I took a little break on my building and am about to get back at it. I have one post which is off layout by five inches. It bugs me and it also makes the door opening on one side of the post too small. I am thinking about removing the post and resetting it correctly.

The question is do you have ideas on how that can be done and if there are problems in doing that which could make things worse? 

Please let me know if you have ideas. Jake

DEAR Jake: You are not the first person to have this happen, when I was building post frame buildings in the 1990’s, more than once we had well trained crews create the very same challenge.

Best thing to do is to wrap a chain around the post and pull it out with a backhoe or skid loader. Break the concrete collar off with a sledge hammer. Clean out the hole, replace the column in the proper location and re-pour concrete collar. It takes a little work, but it’s really the best answer –and overall, you will sleep better too!

Mike the Pole Barn Guru