Long-Span Truss Installation Guidance for Post-Frame
Originally published by: Construction Magazine Network(link is external) — January 18, 2021
The following article was produced and published by the source linked to above, who is solely responsible for its content. Hansen Pole Buildings, LLC is publishing this story to raise awareness of information publicly available online and does not verify the accuracy of the author’s claims. As a consequence, Hansen Pole Buildings, LLC cannot vouch for the validity of any facts, claims or opinions made in the article.
Editor’s Note: The article below is the first in a ten-part Structural Building Components Association series on long-span truss installation guidance specific to the post-frame industry, all of which will be published in Frame Building News(link is external).
By Sean Shields, With Contributions by Jim Vogt, P.E.
If you’ve installed long-span wood roof trusses long enough, you’ve likely experienced the “spaghetti” effect, where the truss members bend or buckle out of plane and make the truss very difficult to handle. It’s one thing if it happens while you’re hoisting a single truss into place. It’s quite another when a group of trusses are already installed and they all start to flex out of plane together!
Why does it happen? Is it because they were designed wrong? Is it because they were manufactured incorrectly? Is it because they’re “cheap” or made with inferior raw materials? These are common questions and accusations, but they aren’t accurate. This article, and the series it kicks off, will look at how trusses are designed to function in the structural framework of a building, and why it’s so essential to handle these structural components correctly on the job site to avoid the “spaghetti” effect and other issues.
How Trusses Work
Since their invention in 1952, metal plate-connected wood roof trusses have proven themselves to be the most economical and material-efficient structural framing solution for many of today’s buildings. Their superior performance is due to the triangulation of the chords and webs, and their subsequent ability to efficiently transfer loads applied to the top or bottom chords of a truss to its bearing locations.
Further, the ability of the metal connector plates to efficiently connect the chord and web members together, and transfer the member forces across the joints, are what has driven the market to replace traditional stick-framing methods with trusses in almost 80% of all wood roof structures in North America.
It’s important to note, however, that trusses are designed to only support loads applied within a specific, typically vertical, plane. Trusses are narrow in relation to their depth and span and thus require lateral support. Without this lateral support, the truss, or a portion of its members, will buckle out-of-plane (i.e. lateral bending) under far less load than the truss is designed to resist when applied in an unintended manner. This lateral bending increases as the truss span lengthens, which explains why it is more difficult to keep longer span trusses in plane throughout the installation process. Once a truss is subject to loads (even gravity loads) outside of those planes it is specifically designed to support, you have potential to experience the “spaghetti” effect.

How Trusses Are Made
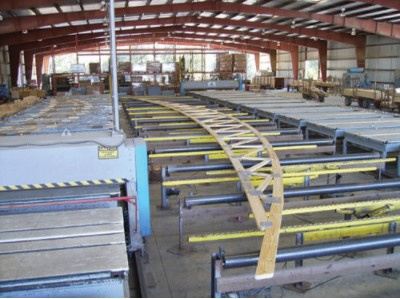
From a manufacturing standpoint, the most efficient way to produce a roof truss is in the horizontal position. If you haven’t been inside a truss manufacturing facility before, touring one would be well worth your time. You’ll witness how the individual wood members are cut and assembled on large tables, the plates are then tacked in place, and then a large press embeds the plates evenly. After the truss is assembled, it’s typically put on a conveyor that takes it out into the yard where each truss is stacked and bundled with trusses of the same or similar size for a particular job. These bundles are then picked up by forklift and placed on the trailer of a truck to be transported to the job site.
All of this is to emphasize that while the trusses are typically manufactured in a horizontal orientation, they are minimally handled as individual trusses in this orientation. Why? Again, because metal plate-connected wood trusses have significantly reduced strength while oriented flatwise and lateral bending can easily cause damage. Banding the trusses together provides greater rigidity to the bundle of trusses and minimizes out-of-plane bending.
Handling Trusses on the Job Site
The effects of banding groups of trusses is beneficial for the manufacturer, but it doesn’t help the installer who is tasked with handling individual trusses during installation. What can be done to minimize lateral bending on individual trusses in the field? Here are three best practices:
First, talk with whomever is delivering the trusses to the job site. The next article in this series will address site preparation and best practices for placement and storage, but it’s important to note that one of the best ways to minimize lateral bending is to limit the amount each truss is handled. Ensuring the trusses are delivered on the job site and off-loaded to a location optimal for installation requires planning and good communication. Ideally, this happens before the truck shows up on site.
Second, make sure the equipment you are using to lift the trusses into place is adequate for the job. An upcoming article will specifically cover best practices for different kinds of equipment. In this context, the key element is ensuring that the lifting capacity and reach of the equipment far exceeds the weight of the trusses you are installing and distance the machinery extends to place each truss.
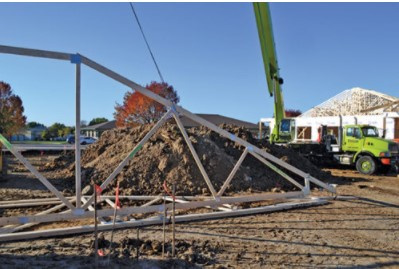
When picking up individual trusses, maneuver them in the vertical, or in-plane, position as much as possible, taking special care to minimize lateral bending. When lifting a truss off the ground, it’s best to have more than one pick point so the weight is distributed between two or more points, as opposed to being concentrated in one point at or near the peak. Longer span trusses require multiple pick points as well as “strongbacking” of adequate length and stiffness to keep the truss from deflecting out of plane.
Third, adequately brace the first truss installed to ground bracing and all subsequent trusses to it and each other to ensure the trusses remain in-plane throughout the installation process.

Consequences of Lateral Bending
The primary purpose of roof trusses are to provide structural resistance to anticipated loads over the life of the structure. This may seem basic, but it’s vital to understand the implications of that statement. Again, all of the loads a truss is designed to resist are within the plane of the truss. The truss is not designed to resist or withstand deflection out-of-plane. When this occurs, significant damage can occur to one or more joints in a truss.
Sometimes the damage is evident during installation. A web member or chord may crack or break. A metal connector plate may begin to pull out of the wood or even come off. Installers can spot this kind of damage without great difficulty and an appropriate repair can be provided and implemented in the field. In some cases, however, the damage caused by lateral bending may not be immediately evident. This can lead to unexpected performance issues later on in the life of the building. At that point, repairs or replacement can cause serious headaches for the building owner.
The Bottom Line
To the greatest extent possible, avoid lateral bending of trusses during the installation process. This can cause significant damage to a truss, sometimes in ways that are not readily apparent. To minimize the potential for lateral bending, make sure the trusses are delivered to a location on the job site that reduces necessary handling, only use equipment that allows you to move individual trusses in a plumb and upright position and enable multiple pick points, and adequately brace trusses during installation to ensure they remain in-plane.


