Tag Archives: joist hangers

Are Externally Mounted (Barn style) Wall Girts Stronger?

Are Externally Mounted (Barn style) Wall Girts Stronger?

Reader and prospective client DON in GARDNERVILLE writes:

“My cat got on my keyboard and sent my mail before I was finished. As I was saying I have been working with Tyson and I have some questions:

 When I was on your website I watched a video that showed your wall girts with a guy standing on them in the vertical position and he stated this is why you should buy a Hansen building because we design them for more strength, but when I was talking with Tyson he said they were bookshelf, My experience as a retired general contractor says that a 2 x 6 laying on its side 10 feet long will sag in the middle, if I am screwing the metal to the sides it will not be a straight line?

 He put 6000 10D nails in my quote, from looking at the drawings on the website I do not see where I would use 10D nails? All the material is 2 x material and a 10D is not long enough to hold a 2 x material. If they are for the hangers for the roof purlins or truss bracing, that is still not the proper nail for 2 x material it requires a cement coated truss nail 1 1/4″ lg x 11 gauge truss nail. So I am confused what they would be for?

 Is there a list of materials that come with each load? My reason for asking this is when the poles are placed they need 2-2 x 4 each to hold them in place while the concrete is placed where is this material or am I supposed to buy it separate?

 Thank you.”

Mike the Pole Barn Guru writes:

Thank you for reaching out.

I am unaware of any video on our website showing externally mounted (wide face to wind) wall girts as being stronger. Bookshelf style girts are far stronger against wind loads. https://www.hansenpolebuildings.com/2012/03/girts/

From Chapter 19 of our Construction Manual: “Between initial installation time and wall sheeting bookshelf girts may sag or droop. Relax, bookshelf girts can be easily pushed up or down by hand, to straight, as siding is applied. Once installed, siding is strong enough to hold bookshelf girts permanently in place.” When wall steel panels are properly pre-drilled (as advised in our Construction Manual) it provides for perfectly straight screw lines.

10d common nails are 3″ long x .0148 diameter and are perfect for nailing two 2x members together without blowing through. Our engineers specify these for joist hangers where the nail is going into two 2x members (such as hangers to double trusses). For joist hangers to single 2x members, call out is for 1-1/2″ x .0148 HDG nails. This nailing meets or exceeds Simpson requirements for hangers.

You will receive a comprehensive Materials List in your online login. Each delivery to your site will also come with its own packing list of materials. Columns and lumber packages are nearly always delivered at same time, providing a plethora of materials for temporary bracing of columns.

Wood I-Joists for Your Barndominium

With many barndominiums being multi-storied, or at least having lofts or mezzanines, there are several methods of structural support. These would include dimensional lumber, wood trusses and I-joists.

In our own post frame barndominium, we utilized I-joists as rafters for both side sheds. They are also floor joists for my lovely bride’s mezzanine sewing loft – a partial third floor above our master bedroom.

When I began my prefabricated metal connector plated wood truss career back in 1977, one of my first jobs was cutting webs for wood floor trusses. Then, wood floor trusses were a fairly new concept, they allowed for much longer clearspans than dimensional lumber, were consistent in size and made for very fast framing.

Floor trusses were (and are) in direct competition with I-joists. I-joists were invented in 1969 and are engineered wood products used for both floors and roofs. They have a great deal of strength in relationship to size and weight.

I-joists require correct installation – meaning a requirement for more experience and training than a dimensional lumber framed floor. Most common mistake is misplacing or improperly sizing holes in OSB (Oriented Strand Board) webs. This can compromise I-joist strength, potentially leading to structural failure. Other common installation mistakes include cutting or chiseling flanges, improperly size joist hangers, improper nailing and wrong sized nails. Rim joists much also match I-joist size as mismatches can strain joists. When an I-joist crosses a main beam, squash blocks must be installed alongside I-joists to transfer loads from I-joist to beam. Missed nails and glue setting too fast can lead to an uneven or squeaky floor. Field modification or repairs usually require manufacturer’s consultation.

I-joists need to be drilled for mechanical installations (e.g. HVAC, electrical, plumbing, etc.) leading to lost-time and effort as compared to open web floor trusses. in order to meet IRC (International Residential Code), I-joists must be covered on both sides of their full solid web with fire resistive chemicals or cladding. I-joists often do not perform well when exposed to fire or water. Thin I-joist webs can be relatively easily damaged or burned through by fire. OSB I-joist webs can be swelled by excessive moisture absorption causing web weakening. Top and bottom flanges (usually 2×4) can exhibit cupping, warping or splitting from excessive swelling due to moisture absorption.

For vibration control, both web stiffeners and blockings can be necessary to obtain desired floor stiffness.

Floor trusses have a distinct advantage for being mechanical equipment friendly. With the ability to design chase openings for ductwork through them, this is a big advantage. But let’s say there is a job site change and the truss company was not informed (never happens right?) and the ductwork must be shifted. Openings in webbing will allow for this adjustment to happen seamlessly. With this type of flexibility, who wouldn’t want floor trusses?

With I –Joists, holes you can actually cut into each joist can be pretty small. These holes also must follow certain parameters. Sometimes this is very limiting and you must stay within certain locations to place holes. Let’s not forget if you cut into a flange, a big no-no, you’re going to need a new joist.

Floor trusses can clear-span with the same floor ratings much further than any I-Joist product. This is very beneficial to frugal barndominium builders and owners out there. Let’s face it though; aren’t we all trying to be more frugal with everything we do? Who wants to put in an extra steel beam and posts or 3-4ply LVL to carry some “I’s” those extra 3’ or 4’ because their span rating is good for distance required? Those beams could add up to several hundred (even thousands) of dollars.

I-Joists may need an increased depth or decreased spacing to span very same distances, using very same design criteria. Bridging and blocking can be increased to “shore” up a floor, but this runs a risk of them being omitted.

In my mind, floor trusses are a winning answer. Are they for you?

Build on a Slope, Joist Hangers, and the Future of Post Frame

This Monday the Pole Barn Guru answers questions about building on a slope with use of embedded columns or brackets on piers, the proper installation of joist hangers, and the Guru’s vision of the future of post frame construction.

DEAR POLE BARN GURU: Because of the 16% slope, I will be using concrete piers & posts to support a traditionally framed floor which will have 1-1/8″ tongue & groove plywood decking. My question — can Hansen provide a design for my timber frame shop which will have a loft? The size of the building will be 36′ x 16′ and the loft 36′ x 24′. KEVIN in SHERWOOD

DEAR KEVIN: We can design and provide your new building as a fully engineered post frame building with either embedded columns, or columns mounted to brackets on piers – basically a ‘stilt’ house type design.


DEAR POLE BARN GURU: Hello, I’ve got a question about the proper installation of the LU joist hangers.

I’m nailing them to the trusses through all the holes in the bracket, but when it comes to nailing them to the purlins using the 10d 1-1/2″ nails, it would seem like I should alternate holes as to not interfere with the nail on the opposite side. The holes that allow nails to be placed in the purlin side of the hanger are not directing the nail in at a 45 degree angle like some others I’ve seen, so just wondering if I should just be directing the nail in to slightly offset the other side? Just seems like a lot of nails in a small area if I do that.

Either way works for me. Just want to be sure I’m not mistakenly compromising anything by installing all those nails. BOB in MOSINEE


DEAR BOB: Weirdly enough I have installed probably tens of thousands of joist hangers and had seriously never given a thought to this (or experienced a challenge). Obviously the engineers at Simpson Strong-tie have thought this all through in designing these parts. I would think even if you were able to drive nails in from opposite sides perfectly so as they would hit each other, the point of the nail from one side would tend to deflect the nail from the opposite side. In all reality, because the holes are so close to the truss, the nails are going to be driven in at a slight angle (whether driving by hand, palm nailer or a gun). Installing all of the nails should not compromise the wood.

DEAR POLE BARN GURU: How do you foresee the post-frame market in the next 3-5 years? SCOTT in CHICAGO

DEAR SCOTT: I feel post frame construction will be the largest growth market in construction over the next five years. It is becoming increasingly popular as residences, especially with people fleeing big cities. Post frame buildings afford many opportunities not seen with other structural systems – minimal concrete for footings, easily erected DIY, easy to super insulate, rapid construction, vastly customizable.


There is a Right Way and This Way

There is a Right Way and This Way

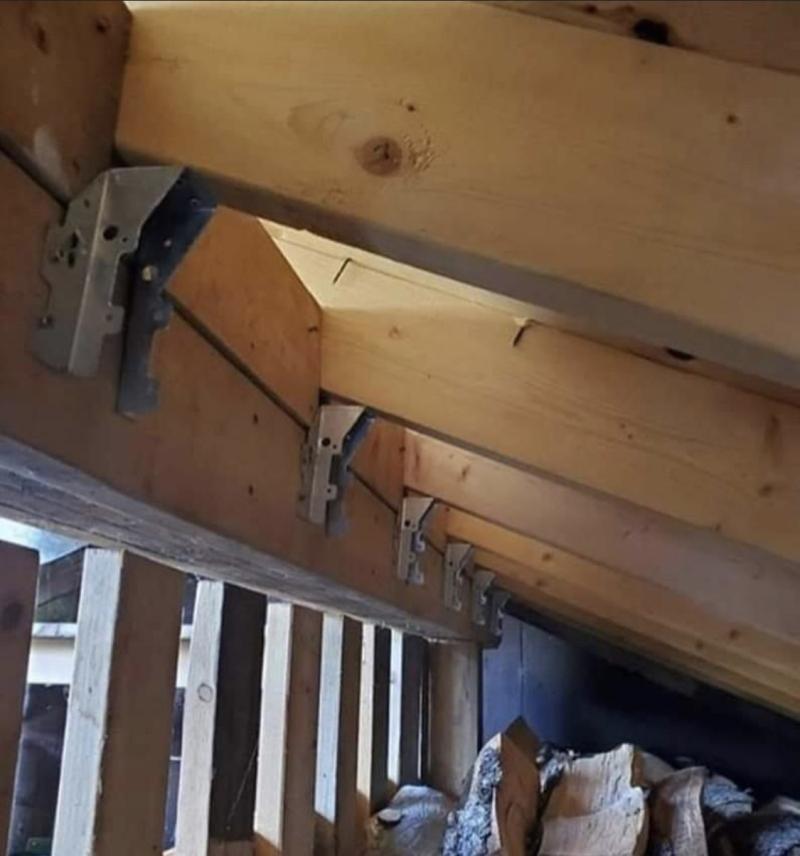
When it comes to building construction, there are a plethora of both right and wrong ways to do assembly. Pictured below is a wrong way (does not happen to be post frame construction).

Roughly 20,000 post frame buildings of experience has taught us virtually anyone who can and will read instructions composed in plain English, and is physically able, can construct for themselves a beautiful new building.

There does exist a certain subset of humanity who are incompetent. Not only just incompetent, they will fail to recognize their own lack of skill, fail to recognize genuine skill in others and fail to recognize how extreme their inadequacy is!

For extended reading on this subject, please see: https://www.hansenpolebuildings.com/2015/01/dunning-kruger-effect/

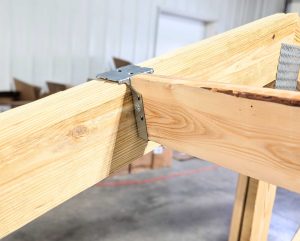
Now we do make every effort to attempt to prevent even those who are incompetent from creating situations similar to what is pictured in this photo. For those without prior construction experience and have never really looked at a building under construction (or photos of one), this photo shows sloped rafters supported by engineered steel brackets (joist hangers). Properly designed and installed, joist hangers will support members from blowing away (uplift) as well as what I refer to as, “The Denny Lee Effect”.

As a college sophomore, at Bozeman’s Montana State University, I took Professor Denny Lee’s Physics class. Now Denny was quite a showman. First day of class – in a huge lecture hall filled with hundreds of eager students, he offered a semester’s A to anyone who could explain how gravity works.

Hands popped up everywhere, answers and theories were flowing like hot air balloons in Albuquerque in summer – and Denny shot them all down.

After we all gave up, Denny gave us his answer, “The Earth sucks”.

As pictured (installed upside down), gravity might not be a factor, however uplift would be.

Every Hansen Pole Buildings’ blueprint is fully engineered and detailed showing every component, where they are installed as well as how – down to each joist hanger, nail and screw!

If this is not enough, 66,000 plus words of step-by-step assembly instructions in the Hansen
Buildings Construction Manual walk either a DIYer or builder through every step.

But wait – there’s more!

(No, not a ginsu)

Lost, dazed, confused or just needing moral support?

Included in each and every Hansen pole building purchase also is unlimited free Technical Support from people who have actually built post frame buildings!

Post Frame Building Clients Can Be So Fun

Post Frame Building Clients Can Be So Fun!

In providing “The Ultimate Post Frame Building Experience”™ Hansen Pole Buildings is not selling buildings to anyone – we are providing a service. If there is such a thing as a past life or lives, I must have been some sort of instructor in a past life. I am so enjoying our clients who want to know about their buildings, how they work and how to get the ultimate strength results from the new post frame building kit packages. These are the clients whom I know will easily construct a finished building with far better workmanship than they could ever pay a builder to do.

One of my current favorites is a Mr. W. I have never had the privilege of meeting him in person, we have not even spoken on the phone. However we’ve had some super email interactions. I could be mistaken, but he seems like the type of person with whom I could sit for hours and discuss buildings over cold adult beverages.

I’d like to share with you a recent exchange between us:
Ralph wrote:

“Thanks for the excellent information! Very encouraging to have these pesky issues put to bed.
I have Joist Hanger questions on the LU28’s that hold the 2×8 Purlins:

1. I assume I will nail perpendicular through the holes? Not angled like the LUS style hangers?
2. 8 nails into the truss? Use all the holes?
a. Double truss should I use 10d x 3” common HDG? Or just use 10d x 1-1/2” joist nails always?
b. Won’t nails into hanger on opposite side hit these nails or cause problems if using 10d x 3”?
c. Single truss should I use 10d x 1-1/2” joist nails?
3. 6 nails into the purlin? Use all the holes?
Use 10d x 1-1/2” joist nails?
4. All the purlins are under compression except at the single truss ends. Should I use SDS screws on the hanger-to-truss ends? The sheet metal will eventually provide the compression needed I’m sure.

Thanks,
Ralph”

To which I replied:
“Mr. W. ~

Thank you for your kind words.

When using engineered hangers, always nail in the direction of the holes (if no “bubble”, so the hangar nailing area is flat, nail straight in). Always nail through every hole which will allow for the fastener to have tips into wood without causing undue splitting. In most instances, only a portion of the holes actually need nails to be adequate to support the appropriate loading conditions, however having open nail holes tends to become problematic to field inspectors and we prefer safety over remorse.

In double trusses use three inch nails, if you place two hangers back to back, you will notice the holes in the flanges do not align with each other for this very reason. Single trusses – use 10d x 1-1/2″ nails. While the nails will prove to be adequate, SD screws (in my humble opinion) are a superior fastener and I encourage their use whenever possible and practical.”

Kindest Regards,

Mike the Pole Barn Guru

For related reading:
Simpson Strong-Tie® hangers:

https://www.hansenpolebuildings.com/2013/08/simpson/

and

https://www.hansenpolebuildings.com/2016/02/hang-those-joist-hangers/

Strong-Drive® Screws (aka SD screws):

https://www.hansenpolebuildings.com/2017/03/simpson-drive-screws/

Joist Hanger nails:

https://www.hansenpolebuildings.com/2013/01/tico-10d-common-nails/

Simpson Drive Screws

Simpson  SD#9112 Screws

Our clients tend to build great relationships with the Hansen Pole Buildings’ Wizardess of Deliveries…Justine. Due to this, she fields more than a few questions from clients which should be directed to our Technical Support Department. Justine has learned enough, however, so she has the ability to answer a plethora of the questions which come her way.

Here is one from just this morning:

“Good Morning Justine,

 I have a question about building fasteners. I looked at the plans and see they spec a LU24,LU26, LU28, H1 and LSTA12 for the Hangers/ connectors. These would normally take a 10d 1-1/2″ hanger nail. I see that Simpson Strong tie makes a screw #SD9112 that meets the specs for all the connectors that I’ll be using. Does engineering have any issue using these specific screws instead of nails?

 David”

For those of you who are unfamiliar with Simpson Drive Screws, you can read more about them here: https://www.hansenpolebuildings.com/2013/01/strong-drive-screws/.

Personally I adore clients like David. They are on the ball about coming up with solutions – which is why Hansen Pole Buildings is what it is today – we listen to clients who offer good ideas founded in fact. We take every even semi-practical solution to heart, doing an analysis as to does it make our buildings better, easier to construct and without insurmountable added costs.

I truly like screws. When I did the framing portion of the remodel of our home near Spokane, Washington, I used screws to assemble everything. In the long run it was faster, allowed for changes without destroying materials and I saved my left thumbnail.


https://www.strongtie.com/strongdrive_exteriorwoodscrews/sd_screw/p/strong-drive-sd-connector-screw

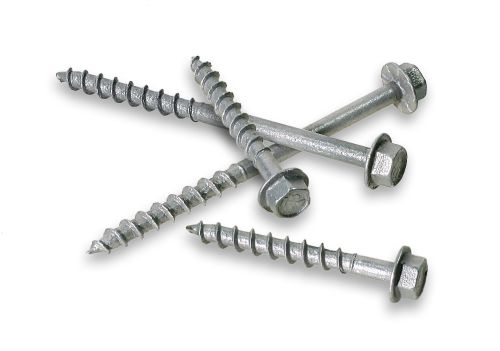
There is no  problem with using Simpson Drive Screws to replace 10d common nails when specified for Simpson connectors  – one should use the 1-1/2″ part 9112 for applications where screwing into 1-1/2″ (single 2x) and 9212 for screwing into 2 members (like hangers into the interior double trusses).
Here is where I get myself into hot water by suggesting Hansen Pole Buildings increase our inventory. My recommendation to Justine (and Eric, the Managing Partner) is we can buy these in bulk from Simpson and then offer them as an option after the sale – or even better program them into the Instant Pricing™ and just include them. It would be a heck of a sales tool, in my humble opinion.

Reading this article and have an opinion? We would love to hear from you….is this a benefit which would be of interest to you on your new post frame building?

Not a building Under Construction

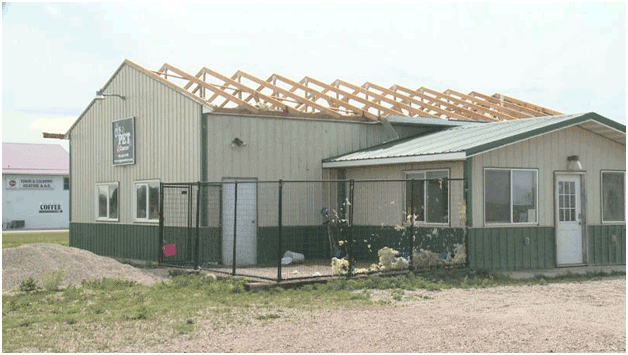
No This is NOT a Building Under Construction

Here is the story from the building owner…..

“When we pulled up here, about a quarter to 12 last night, is when I noticed I could see some insulation and then I got out and took a walk around and that’s when I saw that we had no roof,” Joel Hildebrandt said.

Hildebrandt is the co-owner of CJ’s Pet Center in Hawley, Minnesota. During the storm, one of his employees was inside when the damage happened.

“A year’s worth of hard work, not just dollars, and the time,” Hildebrandt said.

Hildebrandt says he’s thankful that no one was hurt.

“Everybody was wet, guests included, but everybody was safe,” Hildebrandt said.

The employee was able to survive the damage by hiding in the bathroom, away from windows.

Something everyone should do when the weather turns ugly.

not-under-construction

This building style is what I refer to as a four and eight building – it has columns along the eave sides spaced every eight foot on center, with trusses every four feet supported upon headers (also known as truss carriers).

This is also not a post frame building designed and provided by Hansen Pole Buildings. Our preference is to use a frame system where all of the trusses are doubled and attached directly to the columns. Purlins are attached to trusses with engineered steel hangers manufactured by Simpson Strong Tie (https://www.hansenpolebuildings.com/2013/08/simpson/). We’ve solved the weakest links.

I had addressed a similar structural challenge, in regards to post frame building failures, back in April of 2014: https://www.hansenpolebuildings.com/2014/04/nationwide-2/.

In the case pictured the purlin to truss uplift forces are one-half as much as would this be if trusses were every eight feet.

Still, I have always believed the purlins as fastened typically will not resist the applied uplift loads. The photo proves my point. The roof trusses are intact and still connected to the truss carriers, and the roof steel is still attached to the purlins (just no longer on the building).

When I do an analysis of a failure (or potential failure), I look for the weakest link. More often than not, the weakest link is actually human error.

In the pictured building, the weakest link ended up where I most likely would have guessed it would be.

Mind the Purlin Gap

Simpson Strong-Tie® has a blog dedicated to Structural Engineering. A recent post written by David Finkenbinder addressed gaps where a member is attached to another by use of a structural hanger.

Mind The GapHere is an excerpt from the blog:

“Have you ever seen this famous sign? You may have seen it while riding the London Underground, to draw attention to the gap between the rail station platform and the train door. The warning phrase is so popular that you may also recognize it from souvenir T-shirts or coffee mugs.

In the connector world, the phrase comes to mind when thinking of the space, or “gap” between the end of the carried member and the face of the carrying member. Industry standards for testing require that a 1/8” gap be present when constructing the test setup (in order to prohibit testing with no gap, where friction between members could contribute significantly), so this is the gap size that is typically permitted for the joist hangers listed in our catalog.

Gaps exceeding 1/8” can affect hanger performance in several ways. A larger gap creates more rotation for the connector to resist by moving the downward force further from the header. Fasteners may also have reduced or no penetration into the carried member due to the gap. Testing confirms that these factors decrease hanger allowable loads for larger gaps.”

In pole buildings where roof purlins are attached to either metal plate connected wood trusses or rafters with hangers, other issues can also result from gaps.

When screws are driven through roof steel and the points end up in a gap – leaks can result. If, as we recommend, all of the purlins have been cut to length in advance, gaps create an overall length “creep” in the roof. This can cause waves in the end truss or rafter (if no end overhangs are present) or fly rafter with an end rafter.

With some prudence, gaps can be avoided.

Make sure both ends of purlins are cut square. While lumber cut at the mill is supposed to be square at each end, there are exceptions. In almost all cases the purlins need to be trimmed to length, so each end can be cut back, if needed.

Even with perfectly square cut purlins, it is essential they are placed in the hangers so each end is tight to the carrying member. It is easiest to fasten the same end of all purlins, then use a come-along to pull the other carrying member tight.

Avoid the Gap – keep everything tight and the overall result will be satisfying both aesthetically and structurally.

Hangers & Toenailing

As the Nail Turns….

Every once in a while I write something which “touches a nerve” for someone.

Here is an, “Ask The Pole Barn Guru” exchange which got an engineer entertained:

https://www.hansenpolebuildings.com/blog/2014/06/hangers/

And here is the feedback:

“You are very knowledgeable on almost every topic I read, but from one PE to another I am sad to read this post from you.  The toenails that “Novice” is inquiring about are a requirement in numerous hangers from Simpson, they are called double-shear nails.  For you to promote the use of the 1 1/2″ hanger nails amazes me.  The three particular hangers you call out do not need the toenails, but there are several issues with those hangers, if you are using 1 1/2″ nails you have to take a severe penalty to the load values listed, as well as the fact that those hangers do not offer the best solution.  If there is one thing that makes me cringe on projects is improper fasteners, and to see you promoting it amazes me.  I sincerely hope you write a new article on the matter.”

To begin with – let me say I am highly flattered for a PE (Registered Professional Engineer) to assume I am also a PE. My training is in architecture and while I am structurally highly versed in post frame design, I would be remiss if I did not make it perfectly clear to my readers …..(disclaimer time – drum roll)…..

I am not a Registered Design Professional (RDP). Any recommendations I make, are based upon my educational training, as well as over three decades of actual experience in the prefabricated metal connector plated wood truss industry and the post frame industry. My advice has always been – and always will be – to consult with a RDP prior to taking any structural course of action.

While “novice” may have indeed been concerned about double-shear nailing, I am more inclined to believe the nails into the hangers on decks viewed by novice were not.

Why?

Engineered hangers are typically selected due to ability to carry the required loads, ease of installation and price.

Using (6)-10d common nails into the header and (4)-10d x 1-1/2” nails into the joist a Simpson® LU26 hanger will carry 700# of floor load, 795# of roof at a 15% increase for Duration of Load, or 565# of uplift. All of these values are for use with DF-L (Douglas-Fir/Larch) lumber.

A double-shear alternative to the LU26 would be the LUS26, with (4) 10d nails into both the header and the joist. The comparative values are 865# / 990# and 1165# respectively.

All of these values are based upon a minimum nail penetration into the side member (the piece of the nail is being driven into) of 12 times the diameter of the nail. In the case of a 10d common (0.148 inch diameter) the nail must extend 1.776 of an inch into the “holding” member. Where a 1-1/2” long 10d common is used, the above values would need to be decreased by multiplying by 0.845. Popular framing lumber species such as SPF have a lower specific gravity and the values much be further reduced by multiplying by 0.86.

Mind numb yet? Just wait…..it gets better!

So, what kind of loads are going to be placed on either of these example joist hangers? Either of them will support either a 2×6 or a 2×8. For a 2×8 #2 DFir, placed on edge as a roof purlin and spanning 12’, spaced every 24”, will support a combined live and dead load of roughly 43.4 psf (pounds per square foot). The reaction at each end of the purlin would be 520.8#. The LU26 above supports 990 X .845 X .86 (for nailing into SPF) or 719.4# using all 10d x 1-1/2” nails.

Either hanger is going to adequately carry the majority of loads placed upon it in typical pole building construction (of course every specific case should always be verified by a RDP).
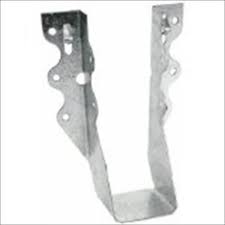
Simpson HangerEase of installation….according to Simpson Strong-Tie, the LU26 is virtually tied with the LUS26 for ease of installation.

Cost….the $64,000 question…..Simpson’s catalog online has a list price of $0.88 for the LU26 and $1.17 for the LU26. For most installations the 33% increase in cost, does not justify the unneeded 24% extra strength.

Back to the original posting which began this brouhaha…..Eric’s self-storage building has a design where roof purlins are hung into the side of a single 2x rafter, this design solution negates the ability to utilize a nail into the rafter of longer than 1-1/2”.

A typical Hansen Pole Building kit package utilizes a two-ply ganged wood truss, which is three inches thick. Our installation instructions for Simpson LU series hangers are to attach them to the double truss with 10d common x 3 inch long nails, therefore getting full value from the length of the fastener.

My summary to the responding PE…..

Due to cost, it is unlikely “Novice” has viewed many installations using Simpson JUS series hangers. I still believe the great majority of any splitting he has seen in deck installations is due to improper nailing, or the particular species of wood as it is being used.

For this particular set of circumstances the “severe” penalty of being able to utilize only 84.5% of the tabulated strength does not jeopardize the safety of the completed structure.

While there may be “better” design solutions, the Simpson LU series hangers are adequate for the loads being imposed, as well as less costly than other alternatives.

I am in total agreement about the use of proper fasteners – there are a plethora of cases of building failures of all types due to inadequate or improper fasteners – from backyard sheds to high rises.

When in doubt (which will be in most situations) consult with an RDP for an adequate design solution or solutions to any sort of structural construction question. And be sure to have them sign and seal any plans or calculations done for you.

P.S. In case the average reader has not deduced, I am a firm believer in sound structural design done by an expert, not just doing it the same way it worked for Uncle Billy Bob’s second cousin’s friend’s neighbor.
Simpson Strong Tie

I believe in the use of engineered connectors, wherever they can be prudently used in post frame (pole building construction). The average consumer who has visited a lumber yard, or a big-box home improvement center has probably seen many of them, but may not have given them more than a passing thought.

About two decades ago, when I was constructing pole buildings, one of our clients called us after a freakishly high wind storm (significantly higher than the design Code required wind load, at the timSimpson Strongtie H1 Hangere, of 70 miles per hour) had plowed through their building. This particular building had 2×6 roof purlins on edge, cantilevered over the endwall roof truss, to support the end overhang. The wind literally tore the purlins off the end truss, and flipped the first bay of the roof upside down onto the second bay!

In doing forensic analysis, after the wind died down of course, we determined the connection of the purlins to the end truss with toenails was adequate to have withstood a Code wind load, but not the wind speeds which had attacked the building. The solution for the repair, as well as for future building designs was to utilize a Simpson H-1 bracket to attach overhanging roof purlins to end trusses.

Typical Hansen Pole Buildings utilize many engineered steel connectors manufactured by Simpson.  Most typically they include joist hangers to attach roof purlins and bottom chord bracing to interior trusses and strap hangers to attach X bracing to trusses as well as end trusses to columns in high wind load applications.

There is an interesting history to the development of Simpson brackets, which I had been unaware of:

“The Simpson Family has been in the San Francisco Bay Area building community since 1914, but it wasn’t until the mid-1950s that they launched the business that would become a world leader in their industry. And it all really began with a visit from a neighbor.

“The doorbell rang one Sunday night in 1956,” recalled Barclay Simpson, who took over a window screen business from his father in 1947. Outside was a neighbor who was looking to make structural connectors for the ends of 2x4s for a flat roof. Could Simpson help him out? “I said, ‘Of course’ and then tried to figure out whether I could.”

It was that request for a joist hanger that led to the creation of Simpson Strong-Tie, a global company with more than $550 million in sales worldwide (2010), more than 1,800 employees, and nine U.S. and 10 international manufacturing locations. As a publicly traded company, Simpson Manufacturing Co. has had exceptional performance records since the company’s 1994 IPO. As a result, it has consistently commanded the respect of industry analysts for its market leadership, strong fiscal management, and innovative approach to growth.”

My experience is, if an engineered steel connector exists, Simpson makes it – and if it doesn’t exist, their engineering team will find a solution!