The following article will appear in April 2019’s Component Manufacturing Advertiser magazine (www.componentadvertiser.com).
Early every year NFBA (National Frame Building Association) holds its annual Frame Building Expo – where thousands of post-frame builders, design professionals and vendors meet for three days filled with break-out sessions, guest presenters and of course a trade show.
In 2019’s Expo, one breakout session was, “Avoiding Common Building Failures in the Post-Frame Industry” presented by Ryan Michalek, P.E. of Nationwide Insurance.
The “trailer” for this session was, “Would you find it surprising that Nationwide Insurance’s loss experience with post-frame buildings is disproportionately represented by newly constructed facilities? The company’s loss history is full of buildings that are less than 5 years old and that fail when subjected to their first moderate wind or snow loading event or to a modest commodity-loading cycle. This presentation discusses the common oversights in post-frame building design and construction which lead to building loss and offers strategies to eliminate these oversights.”
I quizzed Mr. Michalek myself as to how many of these failures were subjected to a structural plan review by a Building Official. His opinion was few, if any, failed buildings were designed by a registered design professional RDP (registered engineer or architect), as they are nearly exclusively “agricultural” structures, exempted from Building Permit processes in many states.
My personal belief – every building should be designed by a RDP, as well as being subjected to structural review by a Building Official. Knowing Insurance Industry size, I questioned why it was Nationwide® and other insurance companies were not lobbying for stricter rules for these now permit exempt buildings. Mr. Michalek minced no words in stating United States agricultural lobby having far more power than insurance industry lobby.
I am just not grokking thought processes of those who would invest in buildings which will underperform or fail structurally, all for saving a few dollars. Considering many failures come from poultry industry buildings, it seems costs and cleanup of a million dead chickens or turkeys would trump a few dollars saved on construction.
What was surprising to me, was an analysis of actual most prevalent failures – although column size and embedment always seem to be big concerns from informed purchasers, it wasn’t a contributor to three major causes of failures: lateral bracing of trusses; purlin to truss connections and unbalanced and snow drift loads on trusses.
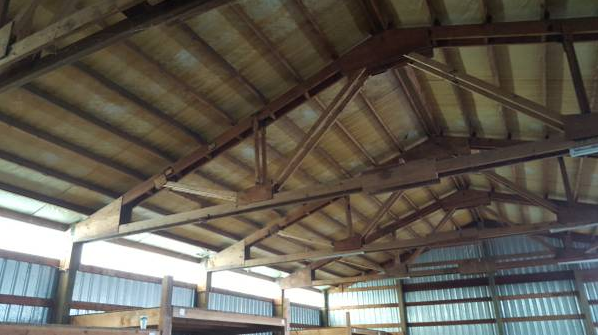
 Typically builders, when they do install bracing, will just run it laterally from building end to building end. This results in all trusses bending together, as loads being placed upon bracing are not being transferred to a very stiff surface – like a roof diaphragm. By utilization of properly designed “X” braces, lateral loads can be transferred into roof plane, and keeping trusses where they are happiest – upright.
Many post-frame buildings, especially those designed with widely spaced single trusses rely upon nailed purlin-to-truss connections woefully inadequate to resist uplift forces. This becomes even more crucial in critical areas such as “end zones” and close to eaves or ridge. A solution would be to use appropriate engineered hangers to attach purlins.
A third common area of failure occurs from designs where drifting snow causing unbalanced loads has not been accounted for. Roof truss designers have an ability to turn off a “switch” in their engineering design programs accounting for drift loading. This results in a less expensive, although under designed truss. With no structural design review, no plan’s examiner will catch trusses being inadequately or inappropriately designed.
Not only do trusses need to support unbalanced snow loads, so do roof purlins. It’s not unusual for an engineered building to have purlins either spaced closer together, or of higher grade or larger size in roof drift areas.
Fast forwarding to 2019’s NFBA Expo – where a frequently heard topic of discussion revolved around a plethora of snow related building collapses in Wisconsin, Minnesota, North and South Dakota. A great majority of these roof failures came from buildings exempted from Building Codes.
While it is impractical, unaffordable or unfeasible to retrofit existing buildings to meet Code loading requirements, we can make changes to minimize or eliminate future failures due to snow. Every time a post-frame building roof collapses, it reflects poorly upon our industry. When prefabricated wood roof trusses fail, truss manufacturers get blamed.
Together these two industries can lobby for changes ultimately making for better and safer buildings.
In my humble opinion, these would include:
Require all buildings over 200 square feet to be constructed from plans sealed by a RDP, as well as to be subject to a structural plan review and field inspections.
Eliminate “agricultural exemptions” from permits.
Eliminate Risk Category I as an IBC option. Risk Category I reduces design loads for snow and wind. This doubles annual probability of failures as compared to Risk Category II.
Eliminate use of Cs to downward adjust top chord live loads due to roof slope and “slipperiness” of roof surfaces. Too many buildings have snow retention systems added to roofs, after completion. This would be all well and good if RDPs and truss technicians were made aware when computing their designs.
Create minimum design dead loads of five psf (pounds per square foot) for both top and bottom chords of roof trusses. Some post-frame buildings have sheathing installed between purlins and roof steel, overloading top chords. Personally, I receive numerous inquiries every week from building owners who now want to install ceilings in their existing post-frame buildings and find their building’s trusses are not designed to support this weight.
Have Building Departments re-evaluate values used for snow (and wind) loads in their jurisdictions. Allstate® Insurance has a TV commercial featuring actor Dennis Haysbert. Haysbert sits in an open field and questions why there have been 26 “once in 500 years storms” in last decade, when term alone implies they should only happen every 500 years. An increase of design snow load of only 15% cuts annual probability of a failure in half!
Hopefully we will learn from this past winter’s collapses and become proactive together to make for better and safer buildings!
 DEAR POLE BARN GURU: I’m curious how far west you service? I’m in WA state and am having a hard time finding anyone that makes kits similar to https://www.hansenpolebuildings.com/pole-barn-prices/ out here. At this point it’s just research. Thanks JON in WASHINGTON
 DEAR JEREMY: Thank you for your interest in a new Hansen Pole Building. We seemingly are designing and provide multi-story post frame building kit packages nearly every day, so yes – we deal with two story barns. We can also provide structural portions of your deck either post supported, or cantilevered depending upon your needs and budget. Unless you have developed a fairly close approximation of what your building should ultimately be like, and are planning upon beginning construction soon, all pricing is going to give you is a guesstimate. Material prices fluctuate so greatly, you could find yourself 25-30% short on funds with an extensive time delay.
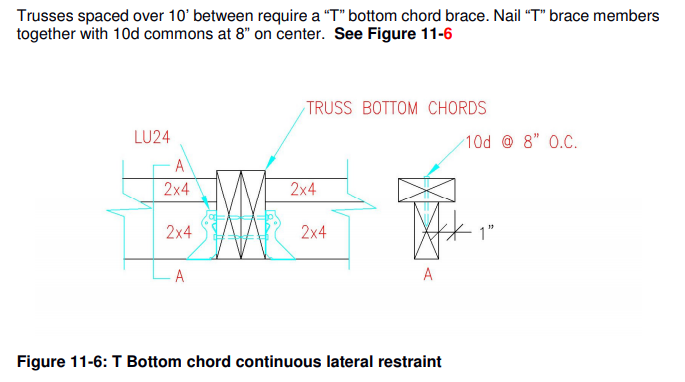
 Typically builders, when they do install bracing, will just run it laterally from building end to building end. This results in all trusses bending together, as loads being placed upon bracing are not being transferred to a very stiff surface – like a roof diaphragm. By utilization of properly designed “X” braces, lateral loads can be transferred into roof plane, and keeping trusses where they are happiest – upright.