Tag Archives: pole building home

Lofty Barndominium Ambitions

Lofts and mezzanines (https://www.hansenpolebuildings.com/2020/03/a-mezzanine-for-your-barndominium/) are popular inclusions in barndominiums. Even though my lovely bride and I have a mezzanine in our South Dakota shouse, they are not often truly practical from an accessibility or economics stance.

Reader Devin in Porun writes:

“I’m designing and building a 42’x50′ pole barn home with 10′ exterior walls. Viewing the plans from the front entry on the long wall, the left half of the interior will be framed rooms and the right half will be a large open kitchen/dining/living room space. I want to have an open loft over the half of the building that has interior framing. I want to be able to stand in the loft for at least 3-5′ each side of center, roughly 6′ of head space when finished. What style/type of trusses do you recommend and at what pitch? Would you use the same trusses all the way across the house, or use different ones for each half with the same exterior pitch? I like the high ceilings over the open portion, but would like to minimize the ceiling height to avoid heating and cooling unnecessary space.  Thank you for your time!”
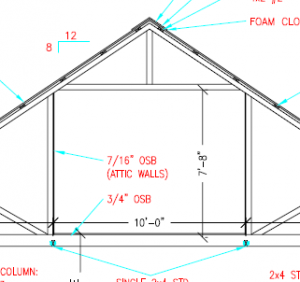

In order to have your greatest possible resale value, you should have any lofted space designed so as to be considered as habitable space. International Residential Code (IRC) Section R304.1 Minimum area. “Habitable rooms shall have a floor area of not less than 70 square feet. R304.2 Minimum dimensions. “Habitable rooms shall be not less than 7 feet in any horizontal dimensions. R304.3 Height effect on room area. “Portions of a room with a sloping ceiling measuring less than 5 feet or a furred ceiling measuring less than 7 feet from the finished floor to the finished ceiling shall not be considered as contributing to the minimum required habitable area for that room.” R305.1 Minimum height. “Habitable space, hallways and portions of basements containing these spaces shall have a ceiling height of not less than 7 feet.”

This space will also need to be serviced by stairs, causing you to lose roughly 50 square feet of floor space.

Now, on to trusses – most prefabricated wood truss manufacturers are limited to building and shipping trusses up to 12′ in height. Allowing for truss top chord thickness, on a 42 foot span your maximum roof slope will most often be roughly 6.25/12. You can order “bonus room” trusses for this lofted area, and should be able to get 7’2″ from top of truss bottom chord to bottom of ‘cross tie’ (allowing for thickness of 3/4″ OSB or plywood subflooring and drywall for ceiling to attain a seven foot finished ceiling) in center 10-11 feet, with a maximum room width of roughly 14 feet. These trusses will come along with a healthy cost premium due to larger members required to make this happen and extra shipping costs. In your open portion, you could utilize scissors trusses to reduce heating and cooling as much space, while still giving a spacious cathedral look.

When all is said and done, you might want to consider a more ‘standard’ and economical roof slope of say 4/12 – and add to your ground level footprint rather than trying to gain expensive space in a loft. Keep in mind, this loft space is going to be difficult to move large pieces of furniture (couches, beds, dressers, etc.) in and out of without damage to walls or items being moved and it will prove mobility challenging (or impossible) for a certain population percentage.

Pole Barn Guru Bonus Questions

Mike the Pole Barn Guru would call this his “bonus round” of questions for the week.  Mike is currently sitting at his son’s bedside at a local trauma care hospital.  While waiting for Brent’s surgery following a late night crash on his motorcycle, Mike is keeping vigil over his son.  He will be ok, but Mike the Pole Barn Guru is like Papa Bear and isn’t leaving Brent’s side until he is assured – all is well and the surgeon kicks him out.

On to Mike’s bonus round of questions…

DEAR POLE BARN GURU: I am writing in regards to the article on insulating and heating your building with in floor heat. How and when did you install the vertical insulation? From what I am reading it needs to go below the frost line. Any help is greatly appreciated! SETH

DEAR SETH: The vertical insulation can be placed at any time prior to pouring a concrete slab inside of the building. Although it could be run down to below the frost line, it is seemingly much easier to follow the guidelines in the NAHB (National Association of Home Builders) “Frost-Protected Shallow Foundations” brochure at: https://www.toolbase.org/PDF/FieldEvaluations/NAHB_fpsf.pdf

DEAR POLE BARN GURU: Thanks for the quick response! Could you put that into more simple terms for me? The building is going up before the concrete and insulation. I’m just trying to make sure I’m not doing this out of order. Thanks again! SETH

DEAR SETH: Here is a rough outline, you must consult with the RDP (Registered Design Professional – engineer or architect) who designed your building for final approvals.

Dig a trench around the perimeter of the building – from the inside line of where columns will be placed, extending outward past the building line by at least the horizontal dimension shown in the Table on Page 8 of the NAHB brochure. The trench should be 28 inches in depth below the future top of your future concrete slab. Auger the post holes for your building, per plan, with the bottom of the holes being no less than 16 inches in depth below the bottom of the trench. Place the columns in the holes, suspended so the base of the column is eight inches above the bottom of the hole. Back fill the holes with premix concrete up to the bottom of the trench.

At a minimum, completely frame the roof of the building and install the roofing. Ideally frame the walls and install siding.

Place four inches of washed gravel in the bottom of the trench. Place two foot widths, of the appropriate R-value (or greater) from the table, vertically on the inside of the pressure preservative treated splash board, with the top of the insulation at the level of the top of the concrete floor. Install Place horizontal insulation (again per the table). Back fill above the horizontal insulation with compactable material. Pour concrete slab over previously prepared and properly compacted surface. Good Luck and let me know how it all turns out!

Mike the Pole Barn Guru

DEAR POLE BARN GURU: Since I need to finance this residential build: I need to know if there is a bank in PA that will legally lend me money to build this? I have heard that banks will not lend money to for residential homes. JON IN SUGAR GROVE

 DEAR JON: The issue is not one of legality – it is going to be finding a bank which will lend to an individual as a “construction loan” to an individual (as opposed to a production home builder), for a home to be constructed on what may very well be unimproved property. Rather than reinvent the wheels, here is further information on construction loans: https://www.wikihow.com/Get-a-Construction-Loan-%28US%29

 When applying for any loan involving a post frame (pole) building residence, I would encourage the description of the home to include language such as: “wood frame with a pressure preservative treated wood and concrete foundation”. Trying to get the average lender and appraiser to wrap their heads around post frame housing is usually an exercise which involves more than a fair amount of education being done by you.

 Mike the Pole Barn Guru

DEAR POLE BARN GURU: I am wanting to install two fireplaces in my new Hansen Pole Building residence. Can you provide the framing materials and custom finished openings necessary for them? BLAZING

DEAR BLAZING: Yes. We will just need to have you supply the horizontal width between framing members, as well as the required height above grade (bottom of pressure treated splash board). A pressure preservative treated column will be located on each side of the opening to provide the needed rigidity as well as resistance to wind and seismic forces.

Mike the Pole Barn Guru

DEAR POLE BARN GURU: I took a little break on my building and am about to get back at it. I have one post which is off layout by five inches. It bugs me and it also makes the door opening on one side of the post too small. I am thinking about removing the post and resetting it correctly.

The question is do you have ideas on how that can be done and if there are problems in doing that which could make things worse? 

Please let me know if you have ideas. Jake

DEAR Jake: You are not the first person to have this happen, when I was building post frame buildings in the 1990’s, more than once we had well trained crews create the very same challenge.

Best thing to do is to wrap a chain around the post and pull it out with a backhoe or skid loader. Break the concrete collar off with a sledge hammer. Clean out the hole, replace the column in the proper location and re-pour concrete collar. It takes a little work, but it’s really the best answer –and overall, you will sleep better too!

Mike the Pole Barn Guru