Tag Archives: post frame barndominium

Wide Clearspan Barndominium Floors

Wide Clearspan Barndominium Floors
Multi-story post frame barndominiums are embracing a great feature found in better stick framed homes – engineered prefabricated wood floor trusses.
Loyal reader RICK in MONTICELLO writes:

“First off, thanks for sharing your knowledge and experience in the blog and answering questions regarding post frame construction with us laymen!
It is very educational and enlightening.

Kicking around ideas currently. Have a 50ish x 80ish building in mind.
And since you suggest working in 6 foot multiples. We’ll go with a 54′ x 84′ two story building.

Thinking about 12′ clear inside height grade level and living upstairs (actually a lake house so to speak).
You mention you have 48′ free spanned with floor trusses.
I’m curious how deep they are and what centers they are installed at.
As I’d like to clear span the 54′ if possible.

My questions and curiosities are:
• You aware of any fabricated wood floor trusses spanning longer than the 48’ you have?
• Would the floor trusses be prohibitive, as far as cost and losing a lot of height due to the required depth they would need to be?

If I free spanned the whole building at 12” centers I’d need 82 of them.
Working from an assumption they would have to be on 12” or 16” centers raises the below questions:

• How is this done in post frame?
• Would I require regular stud walls between each post that first 12’ of building height for the floor trusses to rest upon to transfer the loads to the ground/ foundation?

Hopefully not too lengthy.

Thanks in advance”

Mike the Pole Barn Guru says:
Thank you very much for your kind words, they are greatly appreciated.

With typical residential live loads of 40 psf (pounds per square foot) and dead loads of 10 psf, normally floor trusses are spaced every two feet and their depth will be roughly an inch per every foot of distance spanned. 54 foot clearspan is certainly well within range of prefabricated wood floor trusses.
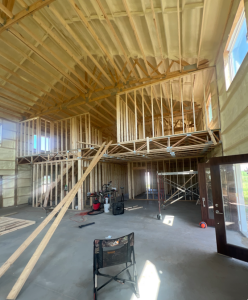
Even with all of my years as a manager of owner of truss plants, 48 feet is as wide as I have participated in – although for our own personal shouse (Shop/house), we wish we would have gone 12 feet wider (no matter what size you build, it is never big enough). Your added investment, for floor itself, between having a myriad of internal columns, or clearspanning is roughly four dollars per square foot. For what it adds in downstairs usability by not having columns or walls to work around, it is worth every cent in my mind. Add to this it allows for all utilities to be hidden from view and they are a winning combination. As we are providing more barndominiums seemingly every day, we have many clients taking advantage of clearspan floor trusses and have never heard a regret from having done so!

Most usually floor truss ends are supported from beams attached to wall columns. This eliminates having to have load carrying stud walls between columns, as well as thickened slab edges or continuous footings and/or foundations. In order to maintain ceiling heights, your building will have to be made taller. In most instances, adding a few feet to a building’s height is relatively affordable.
Busting Post Frame Barndominium Myths

Busting Post Frame Barndominium Myths

Yep, I have been web surfing again and I came across a stick frame building contractor’s website who obviously either doesn’t understand fully engineered post frame construction, or just frankly doesn’t care to add it to his arsenal of design solutions. My comments are in italics.

MYTH #1. MOST BANKS WON’T OFFER CONSTRUCTION LOANS ON POST FRAME POLE BARN HOUSES.
Many lenders refrain from offering traditional mortgages for pole barn homes. For example, Freddie Mac and Fannie Mae will not offer these loans at all.
The small percentage of entities that do offer mortgages for pole barn homes will typically have much higher requirements, because they’ll be using internal money to finance it.
They’ll likely require a 30% down payment (and oftentimes, more than this).

In reality, a fully engineered post frame building is no different than any other wood frame steel roofed and sided home and any lender will approve a mortgage for one as long as you do not use terms like “barndominium”, “pole barn house”, “post frame house”, etc. Apply the K-I-S-S method (Keep It Simple Stupid) and refer to it only as being a fully engineered, custom designed, wood frame home with steel roofing and siding. Period and 100% factual.

But won’t my lender send out engineers and inspectors who will “catch” me building a barndominium, shouse or post frame home? No. Your lender will be concerned about progress, not how you are getting there.

Before going to a lender you will need a place to build (land), blueprints (floor plans and elevations) and a budget (or contract subject to finance approval with a builder).

MYTH #2. THERE ARE NO FOOTERS IN POST FRAMES
Without having footers to protect the concrete slab from freezing, there is the potential that the concrete slab can move or heave around the edges in cold weather. In turn, this can shift interior walls, resulting in damage to drywall finishes and trim.
If you do go with post frame construction, you will have to add footers to stay in code compliance of the IRC. This will add that cost back into the total price of the home.

Your fully engineered post frame home is 100% Building Code Compliant and most typically has pressure preservative treated columns embedded in ground with both concrete footings and bottom collars. Alternatively your home can be mounted to steel brackets set in concrete piers.
Either of these are designed to extend to or below frost lines or are frost protected by use of insulation. Footers themselves do not protect a concrete slab from freezing and heaving, using rigid insulation around slab perimeters is required for either stick frame or post frame. With fully engineered post frame, there is no need to incorporate thickened slab edges or continuous concrete footings and foundations.

MYTH #3. POST FRAMES WILL HAVE LARGER SPANS IN THE ROOF TRUSSES
This is an issue because they’ll have to be filled in before you can hang the drywall.

If you hang drywall “as is,” it will all sag over time, causing structural damage (and a pain in your wallet). Adding this extra framing after the fact will add to the total price tag again.

Most cost effectively your fully engineered post frame building will have double trusses every 10 to 12 feet. If you desire to insulate at ceiling lines, ceiling joists are placed every two feet to adequately support drywall. This combination of double trusses and ceiling joists will still be less expensive than conventional stick framing’s trusses every two feet with structural headers required in walls. By widely spacing trusses, it allows for greater flexibility in locating doors and windows in exterior walls.

MYTH #4. EXTRA FRAMING BETWEEN THE POSTS WILL BE NEEDED
As opposed to traditional wall building, you’ll have to build the walls between the posts after you build on the post frames. This is an added cost to the post frame structure that has already been built.

We can tell this builder has never built (or probably seen) a fully engineered post frame building with bookshelf girts every two feet. All exterior wall framing is taken care of at initial installation, you get a deeper insulation cavity and a better surface to drywall. https://www.hansenpolebuildings.com/2019/09/11-reasons-post-frame-commercial-girted-walls-are-best-for-drywall/

MYTH #5. INSULATION COSTS ARE HIGHER
Your pole barn home will require more insulation on a post frame wall because the walls are thicker than the typical two-by-four construction. Therefore, the cost of insulation will be higher to fill this cavity.

Would you really want an electric bill based off of R-13 insulation in a two-by-four exterior wall? Engineered post frame construction allows for thicker insulation cavities – reducing your energy costs for your barndominium’s lifespan.

MYTH #6. POST FRAME CONSTRUCTION IS TYPICALLY NOT USED WITH BASEMENTS.
Post frame construction is not very conducive when building on a basement, as the basement walls will be made from poured concrete. Trying to adapt a post frame construction to a basement will end up with higher costs than traditional home building techniques. The bottom line: If you want a home with a basement, post frame construction is not the best choice.

Your fully engineered post frame home can easily be engineered to attach to a concrete basement foundation, ICFs or even incorporated into a Permanent Wood Foundation, at similar or lower costs than stick frame.

Barndominium Costs Part II

Continuing my discussion of Barndominium costs from yesterday’s blog…
For sake of discussion, we will use 2400 sft (40×60) of finished living space (includes any bonus rooms) plus 1600 sft of garage/shop. To have a GC (General Contractor) turn-key this for you expect an average of:

2400 X $165.67 = $397,608
1600 X $83.50 = $133,600
$397,608 + $133,600 = $531,208

This is having your barndominium built (turn key), not for owner-builders.
If your barndominium will be very simple, rectangle, standard sizes, with little to no upgrades on finish materials (counter tops, flooring, cabinets, showers, lighting, trim, etc) then your costs could be less per sft.


On spectrum’s other end would be for very intricate, high end, everything upgraded barndominiums. Including things like custom cabinets, real hardwood flooring, high end appliances, custom fireplace, built in entertainment options, oversized windows and doors, vaulted ceilings throughout, steep roof, extra bathrooms/kitchens, etc.

But what you really want to know is what it will cost for you to build it, right?
We will assume you are willing to do some legwork, so if you don’t do any physical work yourself and just act as general contractor (making phone calls, hiring people, ordering materials, dealing with problems, etc) you can build this average barndominium for roughly $186,000 less than it would cost to hire a general contractor.

I can make a LOT of phone calls for this. In fact, I could easily take well over a year off work and still come out ahead!

Beyond making phone calls, hiring people, ordering materials, and dealing with problems, you can lower your price by doing some work yourself.
It’s all about what YOU are willing to do as an owner-builder.

Our prices above are for “stick frame” construction. By using post frame construction with embedded columns, rather than pouring a footing and foundation, a savings of $11,400 (2011 numbers) can be found: https://www.hansenpolebuildings.com/2011/10/buildings-why-not-stick-frame-construction/.
This reduces your $531,208 investment by about 3% to $515,271
NAHB (National Association of Home Builders) allocated percentages in their Construction Cost Breakdown. These included:

Site work 7.4% (of this 1.2% was for architecture and engineering)
Foundations 11% (this includes excavation and backfill)
Framing 20.5%
Exterior Finishes 11.8% (siding, roofing, windows, doors)
Plumbing, Electrical, HVAC rough ins 17.9%
Interior Finishes 24% (insulation, drywall, interior trims and doors, painting, lighting, cabinets, counter tops, appliances, flooring, plumbing fixtures, fireplaces)
Final Steps 5.9% (Landscaping, decks, driveways, clean up)

Of framing and exterior finishes (roughly 1/3rd of costs), if you invest in an engineered post frame building kit package and do your own labor (labor being roughly 1/2 of this portion), save around $83,000 from what you would pay a General Contractor (I can take a lot of time off work for this).

Hansen Pole Buildings GuesthouseAnd my engineered post frame building kit package includes engineering, saving $6,400.
Obviously even more savings can be achieved for those capable of doing electrical and plumbing, however assuming nothing other than what has been listed, your $531,208 barndominium has been built and is ready to move in for roughly $256,000!! This resulted in over a 51% savings and kept over $275,000 in YOUR pocket!!

Of course your investment and savings could be more or less depending upon your tastes and location, however this should give you a feel for where you will be headed. It would be prudent to budget another 1% for every month you delay your start, as well.

Gambrel Barndominium Done Differently

What I Would Have Done Differently With Our Gambrel Barndominium

Pole Barn Guru BlogWhen we built our gambrel roof style barndominium 15 years ago we were in a position financially where we could have done most anything we wanted to. Our property was over two acres in size, so available space was not a determining factor. After having lived in it every day for going on four years, I have realized there are some things I would have done differently. For sake of brevity, I will only discuss main clearspan portions of our barndominium (it has 18 foot width sidesheds).

Footprint

Our center portion is 48 feet in clearspan width and 60 feet deep. Whilst this sounds really big, I wish we would have gone 60 feet wide and 72 feet deep. There is just never enough room and a portion of our half-court basketball court has been taken up with a workout area. Start parking a few vehicles inside and even smaller grandkids are looking for space to dribble and shoot the basketball.

Downstairs Height

16 foot high ceilings might seem like a lot. Doing it again I would go to 20. Makes playing basketball easier for those three point shots. At 20 foot, ceiling would not have been perfect for volleyball, but it would have made a serviceable practice area (given a larger footprint): https://www.hansenpolebuildings.com/2013/09/pole-barn-11/.

Floor Trusses

Yes we could have spanned 60 feet, we just would have had trusses about five feet in thickness. I would have specified a lesser deflection than our current L/360 however (read about floor deflection here: https://www.hansenpolebuildings.com/2015/12/wood-floors-deflection-and-vibration/). I also would have installed a diagonal (top chord to bottom chord) bracing system every 12 feet along building width, tying three trusses together across four feet. This would have further reduced deflection by spreading loads across a wider portion of the floor system.

Knee Walls

Our gambrel trusses are set directly at floor level. In order to have some semblance of sidewalls, we placed a knee wall in four feet from each side, reducing our usable width to 40 feet. While this made our space more functional, ever try to hang pictures on a four foot tall wall? Doing it again, I would opt to raise trusses up either four or eight feet above the floor level. Latter of these would have given wall to wall usable space as well as a more standard wall height.

Upstairs Ceiling Height

We have a 16 foot high ceiling now. While this works, it does make for a short ceiling in my wife Judy’s craft/sewing loft above a portion of our master bedroom. With a 60 foot span, we could easily have had 10 foot ceilings both above and below the loft. Of course Judy would have had to have found a 20 foot tall Christmas tree! (and she would!)

Whatever size barndominium you decide to construct – it will not be large enough. At a minimum I would encourage going no less than 10% greater in space than you think you need. Ready to get serious about planning your new barndominium? Call 1(866)200-9657 to get started now!