This week’s ask the Guru answers reader questions about the costs accrued to finish a home after investing in a kit, performing an extensive remodel on an existing barn or tear down and build a new structure, and a building size recommendation for a grow facility.
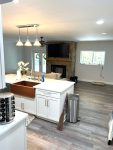 DEAR POLE BARN GURU: After purchasing large kit for residential home what cost can I expect to finish the house? I know a lot depends on finishes and stuff but I want to know if this is a realistic option. We will be purchasing land and we will be installing well and septic but I am just trying to figure building and finishing of house. LAURA in PEARLAND
DEAR LAURA: Assuming you are doing as much DIY as possible, your barndominium building kit is usually about 1/3rd of your overall investment (not including land, site prep, utilities and permits).
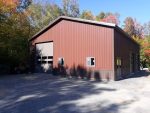
DEAR POLE BARN GURU: We’re looking at purchasing a property that has a large barn. Would it be better to use the existing structure and add what’s needed to make it a combination barn and residence, or should we tear it down to the frame and start from there? And if we do use this existing barn, would your company be able to modify a set of plans for our design? JEFF in OAK HARBOR
 DEAR JEFF: Oftentimes it becomes far more practical to tear down and start from a clean slate. Structural upgrades need to be accounted for in making a barn capable of withstanding higher loads and deflection criteria for a residential structure. Should you decide to utilize this existing barn, you should engage a Registered Professional Engineer to physically evaluate this structure and do an analysis of needed upgrades. Combining a barn with a residence also results in fire separation issues, in some jurisdictions, this can mean up to two-hour fire walls, eliminating any ability to go directly from residence into barn.
 DEAR POLE BARN GURU: My license is for between 2,501 square feet to 7,500 square feet of canopy. What size pole building would I need which would leave me room for drying, packaging, etc? DAVID in MAGNOLIA
DEAR DAVID: Most facilities we have provided have ranged between 6,000 and 10,000 square feet. I always encourage clients to erect as large of a facility as they can economically justify and fit on their property. 50-60% of your space should be dedicated to growing. Any less and it can be a struggle to be profitable, any more and ancillary operations become tight. Plan upon enough height to allow for two tiered growing (minimum 16 feet of interior clear height).
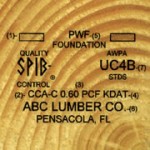 Unless there is some strong objection, embedded columns are probably going to provide your best design solution, as well as being easiest to construct. You will want to specify UC-4B for treatment, as this should assure a lifespan greater than our grandchildren’s grandchildren.


