Tag Archives: shed

Kind Words and Questions From a Future Client

Kind Words and Questions From a Future Client

Reader and future client CHRISTINA in HAWLEY writes:

Firstly, I’m not going to lie. It was YOU (Guru) that kept me more interested in doing business with your company than with others. Even more so than Pioneer Pole Barns here by me and that’s who everyone goes to around here. The knowledge you give out freely to genuinely HELP the public is what stood out to me. Then I met Carson and that was way, way back. Super easy to talk to and he just and still does roll with the punches. I told Caleb he had a winner in Carson. 


We started off with a commercial design and that tanked and then it flipped to residential and now here we are. So, since I’m loyal and Carson stuck it out with me Hansen is getting the business although I’ve had others try to sway me. I feel its right to see this through together with Hansen. Red iron just called last week and nope, not changing.

So now…Can I bug you some more???

I’m meeting with an “erector” named Joe from JLS Constructions, yes, with an “s” at the end (idk). He hasn’t ever put one of these babies up yet but he is eager to learn. I can see that clearly. My question(s) is what would be the right charge to erect my home (3500 sq. ft., 2 rectangle boxes, simple design), how long to do it for a newbie and how deep into winter is too deep to erect? I need that shell up before the first frost, I’m thinking. This way the guys are shielded from inclement weather. Carson has the final if you’d like to take a look.

That’s what I have for questions right now.

*Carson, got your email about the underside of the shed/porch. Gonna ask you maybe a stupid question…if we decide on either metal or wood how do we finish the underside? Are there some sort of layers underneath first before we close it up? Drilling screws into the rafters or some other way? Going to price out both material options. Wood and metal.

With warm regards and appreciation.”

Mike the Pole Barn Guru responds:
Thank you very much for your kind words, they are greatly appreciated. More than anything,    my goal is to assist good people from making crucial errors they will regret forever – whether      they happen to invest in a Hansen Pole Building, or not.

You (or anyone) should feel free to ask me questions at any time – I never feel as though I am    being ‘bugged”.

In my mind, fair market value to erect a post frame building shell should be roughly half of        material’s costs, with client to provide concrete required for holes and builder to provide any nail gun nails. To get a rough idea of “person-hours” required for a build – for a person with limited or no construction experience, divide material cost by 60, for an average builder divide by 120, for a highly experienced builder 180-240.

As Joe has never erected a post-frame building, I would highly recommend he invest in one of  our Construction Manuals (he can reach out to Bonnie@HansenPoleBuildings.com to acquire   one). At over 500 pages in length, it covers most instances one would ever encounter and is     designed to guide an average DIYer.

Time frame wise – I always liked to begin at first frost. Holes can still be easily dug, and it is a    comfortable temperature to work at. It avoids both sweltering heat and frigid cold. Post frame     shells go up quickly and this sort of timing works out nicely for being able to work inside all        winter, then have things wrapped up come Springtime.

For finishing underside of porches – most clients opt to use trusses when they intend to finish    porches out. With ceiling joists installed between truss bottom chords, this makes for a nice        level surface to work from, without having to work around other framing members. As long as    provisions are made for condensation control on roof steel underside (e.g. an Integral               Condensation Control – like Dripstop or Condenstop), there are no other special provisions         required.
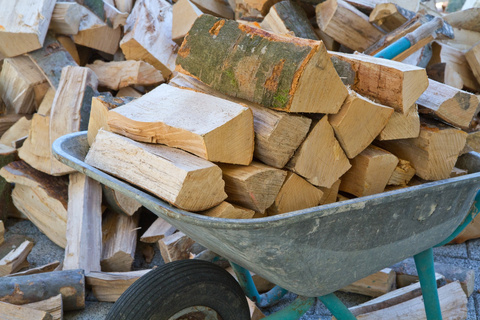
How to Store Firewood

Believe it or not, there’s a bit of science behind putting away the wood you cut for fires. Pole building owners with fireplaces should take heed – while central heating and ventilation options are available for pole barns in the winter, stoking a fire keeps an even and natural heat in a centralized location at low cost.

There are a handful of principles to keep in mind when storing firewood:


Find or Build a Specialized Location
The burnability of stacked firewood benefits from air flow and elemental protection. Each log can also weigh quite a bit, and most people won’t want to carry one or two logs from a remote storage location back to their homes several times a day.

There are 3 ideal places where to store firewood:
1. Close to home – Porches with overhangs make fantastic wood storage locations; they have protection from rain and snow, they are elevated from the ground, and they are right next to the front or back door.

2. On a solid palette – You can create an improvised wood storage area using palette-sized solid pieces of wood or lining up 2x4s to create a wood floor.

3. In an outdoor storage shed – Sheds offer protection from 3 sides and can even provide superior moisture control under the right conditions.

Pick a place that will make it easy for you to refuel your fire when the embers start to fade. Make sure you won’t have to squeeze the firewood into a narrow corridor or questionable corner – jamming firewood anywhere is detrimental to storage for a host of reasons.

The floor of your storage area should be made of wood, concrete, gravel, or asphalt, as long as the material is clean. In desperate situations, you can temporarily place your wood on a tarp to keep ground moisture away from it.

Elevate and Stack
Stack your firewood so that air can flow across as much surface area as possible. Wood doesn’t grow in perfectly round logs and it’s not always easy to stack, but if you try to cut your wood pieces to approximately the same length, they’ll balance on one another with better precision.

Elevation from the ground is vital to keeping wood in burning condition. If left on the ground, logs will suck up moisture and spread it across your stack. Bugs and bacteria love the moisture and the natural nutrition of the wood, so they won’t hesitate to start feasting on the bottom of your stack. The wood will rot quickly and the wood higher in the stack will retain too much moisture to burn well.

Protect the Wood
Try to keep stacks that sit outdoors away from walls or rails. They need air flow to help balance their moisture content. Leave at least a few inches of space between wall surfaces and wood. If you’re stacking wood indoors, it’s okay to stack against a wall.

Put a tarp over your wood once it has finished drying. Do not place a tarp over freshly collected firewood. You can make an exception when rain threatens to soak your firewood since it will benefit more from the moisture resistance of the plastic than suffer from rot and bacteria.

Keep in mind: dry firewood is gray and will have cracks along the edges. Its color will be noticeably lighter than that of wet firewood. Make sure your wood has finished drying before using it in a fireplace.

Ramada – More than Just an Inn

Much of the year I am a “road warrior” – spending two weeks out of every month on planes, trains and automobiles, the next two back at home. Our youngest daughter (now a college sophomore) has threatened more than once to stop by the house when I am away and paste my photo on a milk carton in the refrigerator with the caption, “Have You Seen This Parent”?

On my journeys, an occasional haunt is Ramada® Inn, which this article has very little to do with, other than the name. This morning Eric (one of the Hansen Buildings owners) messaged me to ask, “Is a roof only building referred to as a ‘ramada’”?

Ramada, in the building sense – not the Ramada Inn sense, is a term which originated in the southwestern United States. A ramada can be either a temporary or a permanent structure, generally being just a roof, but could also be partially enclosed.

RamadaOriginally ramadas were constructed with branches or bushes by early southwest inhabitants. In modern times, it is also applied to pole barns which are used to shelter objects or people from the sun.

Many public parks in arid areas of the country may make use of ramadas to protect picnic tables, rest rooms or water sources. As sunlight is more of an environmental hazard than snow, wind or rain in these desert and near desert areas, a roof alone provides significant shelter, even if there are no walls.

In the case of public structures, I’ve designed more than just square or rectangular ramadas – as six and eight sided structures (especially in small spans) make for very attractive picnic shelters.

There are some design considerations when it comes to roof only ramadas. The challenge of designing a roof only ramada is there are no endwalls to transfer wind shear loads from the roof to the ground. This causes the columns to have to do all of the work and increases the pressure they must withstand by a factor of four! The resultant is large dimension columns and very deep holes backfilled entirely with concrete.

Building height also plays into good ramada design. The design formula for the building columns includes the square of the ramada height. Lower height ramadas are going to be far more cost effective than taller ones.

The best ramada designs have one (and ideally both) gabled endwalls covered with structural siding to the ground, over wall girts. In many cases, it is less expensive to add the endwalls to the ramada, than to construct just a roof.

Like the Ramada® Worldwide tag line, “You Do Your Thing. Leave The Rest To Us.” – this applies equally well to the design of your new post frame ramada. The Hansen Buildings tag line follows this train of thought by stating: “Your Building. Your Way.”