Snow Inside of Entry Door
I recently received a message from my Facebook friend Joe, he writes:
“Hey buddy, I have tried to get some kind of help from my builder and they’ve been less than stellar. 80k later and when it snows, I get snow inside my building next to the man door. How do you think I night be able to fix it?”
Now I have had a plethora of clients ask me about a myriad of challenges over several decades. Usually it goes something like, “You won’t believe my problem, I am certain you have never had anything this bad”. I remind them – in a past life, I ran as many as 35 building crews, erecting buildings in six states. If something could be done wrong, chances are, they did it.
Here is one I had not run into previously, although it has a fix (as do most challenges).
This is an installation issue, caused in part by builder ordering a lumberyard ‘builder grade’ entry door with brick moulding attached.
Now steel clad post frame buildings should be maintenance free for decades. As one of few moving parts, it would have been prudent for builder to have ordered an insulated commercial steel entry door with steel jambs, factory finish painted. Most builders and providers are selling by price, rather than benefits, resulting in long term disappointments.
An entry door such as this, is likely to merely be primed white, not finish painted. Unless it is promptly painted, chances are good rust will start to bleed through primer in a matter of a few short years. Oftentimes these doors even come with a warning label affixed to remind of need for paint. Wood jambs also require frequent painting, to keep them from rotting. Jamb material is usually either Hemlock or Pine, neither being naturally resistant from decay. Further, wood jambs are an invitation for nefarious folks to kick doors in and pilfer valuables.
Without brick moulding, J Channel trim around door assembly could have overlapped onto jambs and with a bead of caulk applied between J Channel and jambs, been relatively weather tight. At this juncture, where J Channels are butted up to brick moulding, best hope of minimizing infiltration here would be to use a can or cans of spray foam to try to seal from inside.
In my ideal dream world, an omnidirectional weather resistant barrier (WRB) would have been placed between framing and siding.
For extended reading on Weather Resistant Barriers: https://www.hansenpolebuildings.com/2016/01/determining-the-most-effective-building-weather-resistant-barrier-part-1/ and https://www.hansenpolebuildings.com/2016/01/determining-the-most-effective-building-weather-resistant-barrier-part-2/ and https://www.hansenpolebuildings.com/2016/01/determining-the-most-effective-building-weather-resistant-barrier-part-3/
Now – on to real installation challenge solution. Remove steel panels around door. Place self-adhesive flashing tape (https://www.hansenpolebuildings.com/2019/03/3m-all-weather-flashing-tape-8067/) up both sides (first) and across top, overlapping onto back face (against building) of J Channel around doors. Reinstall steel, placing a screw into girts up close to J Channel.
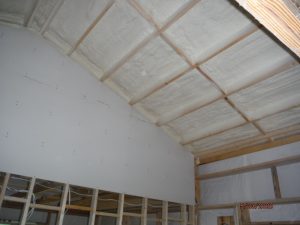 Using two inches of closed cell spray foam directly inside steel siding panels not only air seals exterior walls, as it is an effective vapor barrier, but also provides approximately a R-14 level of insulation. Effective applications also require installing form fitted inside closure strips at top and bottom of every wall steel panel – including window and door openings. Closure strips keep spray foam in your walls rather than oozing out and keeps small crawling and flying critters out.
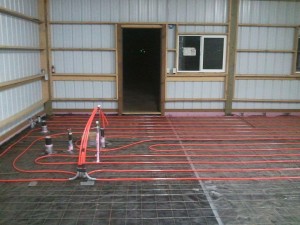 When placing under slab vapor barriers, run up inside of pressure preservative treated splash planks and sealing to top and around columns. Install seal gasket under pressure treated base plate (mud sill) and caulk inside edge to concrete slab.


